<?xml version="1.0" encoding="utf-8"?><feed xmlns="http://www.w3.org/2005/Atom" ><generator uri="https://jekyllrb.com/" version="3.10.0">Jekyll</generator><link href="https://filippwn.github.io/feed.xml" rel="self" type="application/atom+xml" /><link href="https://filippwn.github.io/" rel="alternate" type="text/html" /><updated>2026-04-17T17:10:08+00:00</updated><id>https://filippwn.github.io/feed.xml</id><title type="html">Filip Wozniak - Cybersecurity</title><subtitle>Security research, CTF writeups, and thoughts on offensive and defensive security.</subtitle><author><name>Filip Wozniak</name></author><entry><title type="html">ExchangeHound: Bringing Exchange Abuse Paths into BloodHound</title><link href="https://filippwn.github.io/blog/2026/04/exchangehound-bloodhound-opengraph/" rel="alternate" type="text/html" title="ExchangeHound: Bringing Exchange Abuse Paths into BloodHound" /><published>2026-04-17T00:00:00+00:00</published><updated>2026-04-17T00:00:00+00:00</updated><id>https://filippwn.github.io/blog/2026/04/exchangehound-bloodhound-opengraph</id><content type="html" xml:base="https://filippwn.github.io/blog/2026/04/exchangehound-bloodhound-opengraph/"><![CDATA[<p><img src="/assets/images/exchangehound/logo.png" alt="ExchangeHound Logo" /></p>

<h2 id="introduction">Introduction</h2>

<p>BloodHound is one of my favorite tools for auditing Active Directory attack paths. In the BloodHound v8.0 release, <a href="https://specterops.io/news/specterops-expands-the-power-of-attack-path-management-to-reduce-identity-risk-across-the-enterprise-with-bloodhound-opengraph-and-v8-0/">SpecterOps introduced BloodHound OpenGraph</a>, enabling the community to ingest data from disparate systems and applications.</p>

<p>Over the past year, the community has published several OpenGraph extensions that expand BloodHound’s attack path management capabilities to systems such as AWS, GitHub, and Jamf. The full extension library is available <a href="https://bloodhound.specterops.io/opengraph/library">here</a>.</p>

<p>After seeing that success, I decided to build my own extension: <strong><a href="https://github.com/FilipPwn/exchangehound">ExchangeHound</a></strong>, focused on Microsoft Exchange on-premises environments. Its goal is to give blue teams a graph-based way to identify abuse paths related to <a href="https://attack.mitre.org/techniques/T1098/002/">T1098.002 - Account Manipulation: Additional Email Delegate Permissions</a> and other Exchange mailbox abuse paths.</p>

<p>In this post, I’ll walk through how ExchangeHound models Exchange mailbox permissions in OpenGraph and how those relationships can be used to uncover real attack paths.</p>

<h2 id="why-exchange-delegation-matters">Why Exchange Delegation Matters</h2>

<p>Before diving into the schema, it helps to define the problem in practical terms: Exchange delegation rights are often distributed across large environments and are difficult to reason about in isolation. Permissions like <code class="language-plaintext highlighter-rouge">FullAccess</code>, <code class="language-plaintext highlighter-rouge">SendAs</code>, and <code class="language-plaintext highlighter-rouge">SendOnBehalf</code> may each look harmless on their own, but when combined with existing AD relationships they can form high-impact privilege chains. The same is true for delegated folder access (for example, shared Inbox permissions), which can be abused for stealthy monitoring and persistence. ExchangeHound treats these permissions as graph relationships so they can be analyzed the same way as traditional BloodHound edges.</p>

<p>You can read a great article on this here: <a href="https://www.wojsko-polskie.pl/woc/articles/aktualnosci-w/detecting-malicious-activity-against-microsoft-exchange-servers/">POL Cyber Command has observed malicious activity against Microsoft Exchange servers</a></p>

<h2 id="data-model">Data Model</h2>

<p>ExchangeHound extends BloodHound with Exchange-specific nodes and relationships so mailbox abuse can be analyzed as part of the same identity graph. The model includes objects such as <code class="language-plaintext highlighter-rouge">ExchangeMailbox</code>, <code class="language-plaintext highlighter-rouge">ExchangeMailboxFolder</code>, <code class="language-plaintext highlighter-rouge">ExchangePublicFolder</code>, <code class="language-plaintext highlighter-rouge">ExchangeTransportRule</code>, and <code class="language-plaintext highlighter-rouge">ExchangeRbacRole</code>, connected by edges like <code class="language-plaintext highlighter-rouge">HasFullAccess</code>, <code class="language-plaintext highlighter-rouge">HasSendAs</code>, <code class="language-plaintext highlighter-rouge">HasSendOnBehalf</code>, <code class="language-plaintext highlighter-rouge">HasFolderAccess</code>, <code class="language-plaintext highlighter-rouge">HasCalendarAccess</code>, and <code class="language-plaintext highlighter-rouge">HasPublicFolderAccess</code>. By mapping these permissions into OpenGraph, we can move from isolated ACL review to path-based analysis that shows how Exchange rights combine with existing AD relationships.
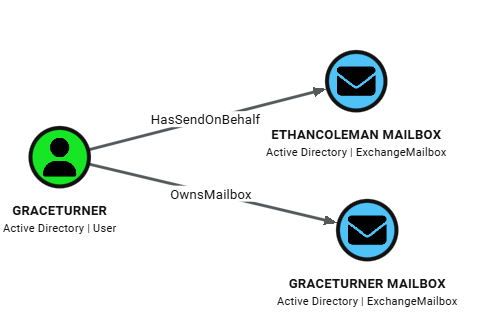
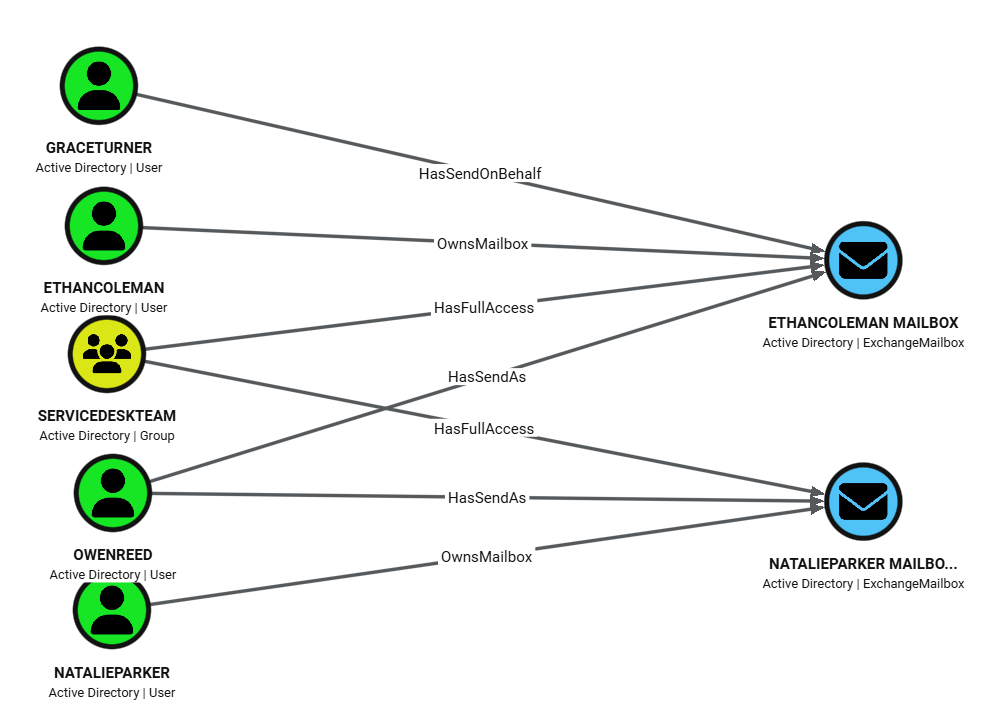
</p>

<p>At the center of the model is the <code class="language-plaintext highlighter-rouge">ExchangeMailbox</code> node, which is linked back to identity through <code class="language-plaintext highlighter-rouge">OwnsMailbox</code> (owner mapping) and to delegation principals through mailbox permission edges. This makes mailbox ownership explicit in the graph and allows us to immediately separate expected access from non-owner access.</p>

<p>This sample query maps user <code class="language-plaintext highlighter-rouge">GraceTurner</code> to Mailboxes:</p>

<div class="language-cypher highlighter-rouge"><div class="highlight"><pre class="highlight"><code><span class="k">MATCH</span> <span class="n">p</span><span class="o">=</span><span class="ss">(</span><span class="py">u:</span><span class="n">User</span><span class="ss">)</span><span class="o">-</span><span class="ss">[</span><span class="nc">:OwnsMailbox</span><span class="o">|</span><span class="n">HasFullAccess</span><span class="o">|</span><span class="n">HasSendAs</span><span class="o">|</span><span class="n">HasSendOnBehalf</span><span class="ss">]</span><span class="o">-&gt;</span><span class="ss">(</span><span class="py">mb:</span><span class="n">ExchangeMailbox</span><span class="ss">)</span>
<span class="k">WHERE</span> <span class="n">u.samaccountname</span> <span class="o">=</span> <span class="s1">'GraceTurner'</span>
<span class="k">RETURN</span> <span class="n">p</span>
</code></pre></div></div>

<p><img src="/assets/images/exchangehound/graceturner.png" alt="GraceTurner Mailboxes" /></p>

<p>
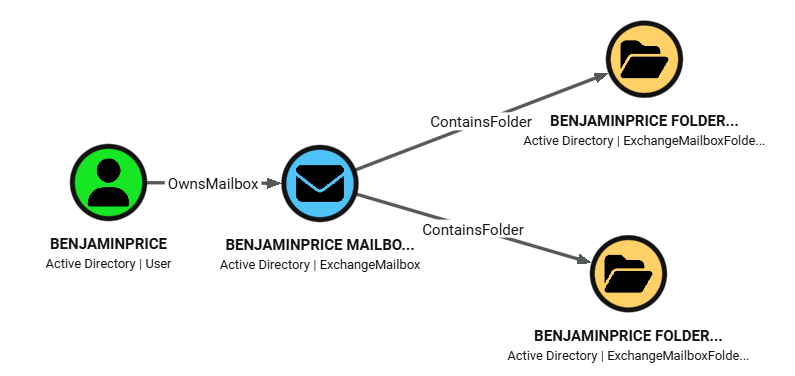
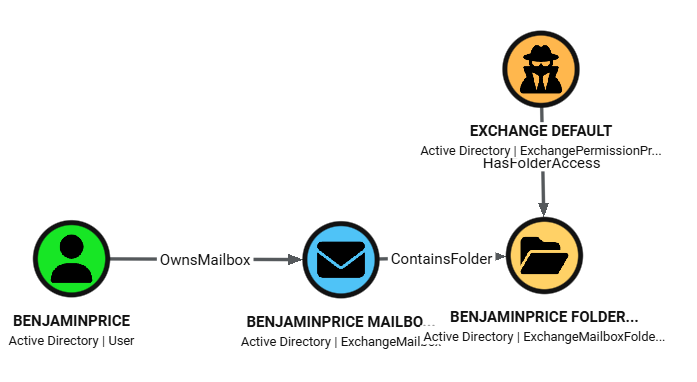
ExchangeHound then adds depth with folder-level objects. <code class="language-plaintext highlighter-rouge">ExchangeMailboxFolder</code> nodes are connected to their parent mailbox via <code class="language-plaintext highlighter-rouge">ContainsFolder</code>, and principals can reach those folders through <code class="language-plaintext highlighter-rouge">HasFolderAccess</code> or <code class="language-plaintext highlighter-rouge">HasCalendarAccess</code> edges. Those edges preserve rights metadata (for example <code class="language-plaintext highlighter-rouge">accessrights</code> and calendar <code class="language-plaintext highlighter-rouge">sharingpermissionflags</code>), so analysts can distinguish broad mailbox compromise from more selective access such as Inbox-only or Calendar-only delegation.</p>

<p>This sample query maps folders in <code class="language-plaintext highlighter-rouge">BenjaminPrice</code> mailbox:</p>

<div class="language-cypher highlighter-rouge"><div class="highlight"><pre class="highlight"><code><span class="k">MATCH</span> <span class="n">p</span><span class="o">=</span><span class="ss">(</span><span class="py">u:</span><span class="n">User</span><span class="ss">)</span><span class="o">-</span><span class="ss">[</span><span class="nc">:OwnsMailbox</span><span class="ss">]</span><span class="o">-&gt;</span><span class="ss">(</span><span class="py">mb:</span><span class="n">ExchangeMailbox</span><span class="ss">)</span><span class="o">-</span><span class="ss">[</span><span class="nc">:ContainsFolder</span><span class="ss">]</span><span class="o">-&gt;</span><span class="ss">(</span><span class="py">f:</span><span class="n">ExchangeMailboxFolder</span><span class="ss">)</span>
<span class="k">WHERE</span> <span class="n">u.samaccountname</span> <span class="o">=</span> <span class="s1">'BenjaminPrice'</span>
<span class="k">RETURN</span> <span class="n">p</span>
</code></pre></div></div>

<p><img src="/assets/images/exchangehound/benjaminprice.png" alt="BenjaminPrice FOlders" /></p>

<p>
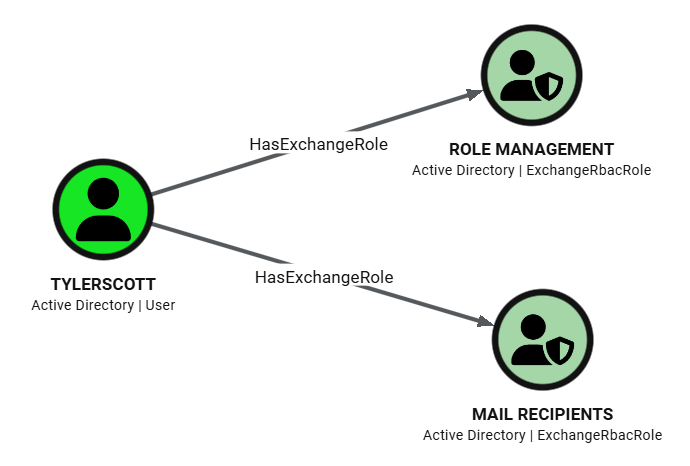
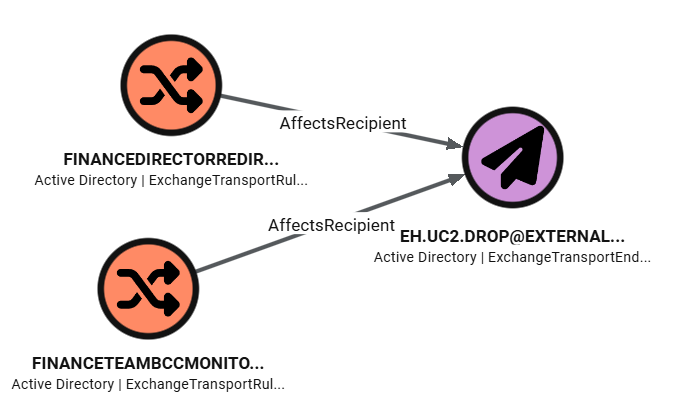
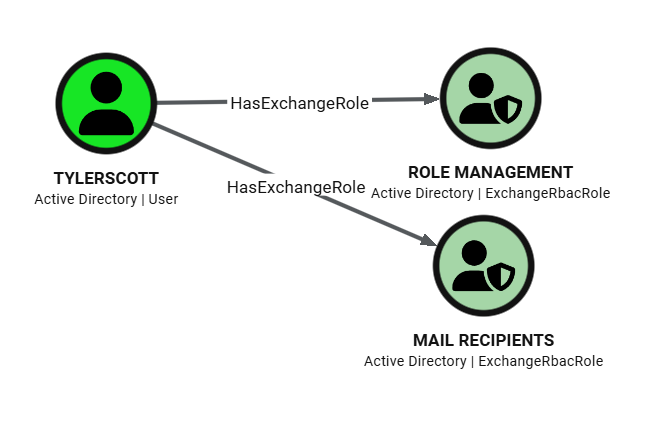
For visibility beyond mailbox ACLs, the model also includes message-flow and admin-control surfaces. <code class="language-plaintext highlighter-rouge">ExchangeTransportRule</code> nodes connect sender conditions (<code class="language-plaintext highlighter-rouge">TriggeredBySender</code>) and recipient/action targets (<code class="language-plaintext highlighter-rouge">AffectsRecipient</code>), including synthetic <code class="language-plaintext highlighter-rouge">ExchangeTransportEndpoint</code> nodes for unresolved external SMTP destinations. <code class="language-plaintext highlighter-rouge">ExchangeRbacRole</code> nodes connected through <code class="language-plaintext highlighter-rouge">HasExchangeRole</code> represent Exchange administrative assignments with assignment metadata and scope fields, which helps identify persistence or privilege expansion paths in management-plane access.</p>

<p>This sample query shows Exchange RBAC roles for user <code class="language-plaintext highlighter-rouge">TylerScott</code>.</p>

<div class="language-cypher highlighter-rouge"><div class="highlight"><pre class="highlight"><code><span class="k">MATCH</span> <span class="n">p</span><span class="o">=</span><span class="ss">(</span><span class="n">principal</span><span class="ss">)</span><span class="o">-</span><span class="ss">[</span><span class="py">r:</span><span class="n">HasExchangeRole</span><span class="ss">]</span><span class="o">-&gt;</span><span class="ss">(</span><span class="py">role:</span><span class="n">ExchangeRbacRole</span><span class="ss">)</span>
<span class="k">WHERE</span> <span class="n">principal.samaccountname</span> <span class="o">=</span> <span class="s1">'TylerScott'</span>
<span class="k">RETURN</span> <span class="n">p</span>
</code></pre></div></div>

<p><img src="/assets/images/exchangehound/tylerscott.png" alt="TylerScott Roles" /></p>

<p>
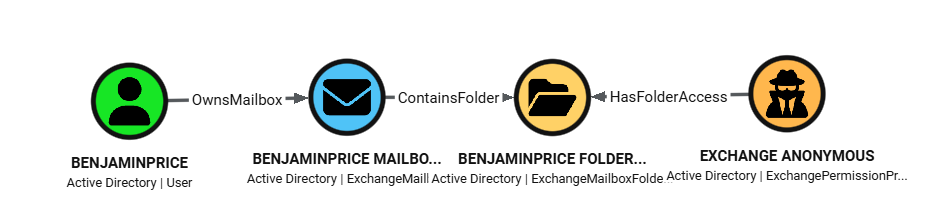
Identity mapping is designed to merge cleanly with existing SharpHound data. Trustee resolution attempts SID-based AD lookups first and uses <code class="language-plaintext highlighter-rouge">match_by: "id"</code> to attach Exchange edges directly to existing AD users/groups/computers. For Exchange-only principals like <code class="language-plaintext highlighter-rouge">Default</code> and <code class="language-plaintext highlighter-rouge">Anonymous</code>, ExchangeHound creates <code class="language-plaintext highlighter-rouge">ExchangePermissionPrincipal</code> nodes instead of dropping the relationship, preserving exposure paths that would otherwise be invisible in AD-only graphs.</p>

<p>This sample query shows Folders in Mailboxes that have anonymous access enabled.</p>

<div class="language-cypher highlighter-rouge"><div class="highlight"><pre class="highlight"><code><span class="k">MATCH</span> <span class="n">p</span><span class="o">=</span><span class="ss">(</span><span class="py">anon:</span><span class="n">ExchangePermissionPrincipal</span><span class="ss">)</span><span class="o">-</span><span class="ss">[</span><span class="py">r:</span><span class="n">HasFolderAccess</span><span class="ss">]</span><span class="o">-&gt;</span><span class="ss">(</span><span class="py">folder:</span><span class="n">ExchangeMailboxFolder</span><span class="ss">)</span><span class="o">&lt;-</span><span class="ss">[</span><span class="nc">:ContainsFolder</span><span class="ss">]</span><span class="o">-</span><span class="ss">(</span><span class="py">mb:</span><span class="n">ExchangeMailbox</span><span class="ss">)</span><span class="o">&lt;-</span><span class="ss">[</span><span class="nc">:OwnsMailbox</span><span class="ss">]</span><span class="o">-</span><span class="ss">(</span><span class="py">owner:</span><span class="n">User</span><span class="ss">)</span>
<span class="k">WHERE</span> <span class="n">toLower</span><span class="ss">(</span><span class="n">anon.displayname</span><span class="ss">)</span> <span class="o">=</span> <span class="s1">'anonymous'</span>
<span class="k">RETURN</span> <span class="n">p</span>
</code></pre></div></div>

<p><img src="/assets/images/exchangehound/anonymous.png" alt="Anonymous access" /></p>

<h2 id="data-collection-pipeline">Data Collection Pipeline</h2>

<p>At a high level, the workflow is: run ExchangeHound on an on-prem Exchange host, generate OpenGraph JSON, prepare BloodHound for custom model ingestion, and then import the dataset either through the UI or through API scripts.</p>

<ol>
  <li><strong>Run collector on Exchange on-prem server</strong>
    <ul>
      <li>Run from Exchange Management Shell (or remote EMS session), with AD resolution available.</li>
      <li>Start with a pilot scope, then expand to full collection.</li>
    </ul>
  </li>
</ol>

<div class="language-powershell highlighter-rouge"><div class="highlight"><pre class="highlight"><code><span class="c"># pilot</span><span class="w">
</span><span class="o">.</span><span class="n">\ExchangeHound.ps1</span><span class="w"> </span><span class="nt">-ResultSize</span><span class="w"> </span><span class="nx">100</span><span class="w"> </span><span class="nt">-SkipSendOnBehalf</span><span class="w"> </span><span class="nt">-OutputPath</span><span class="w"> </span><span class="o">.</span><span class="nx">\exchangehound_pilot.json</span><span class="w">

</span><span class="c"># full coverage</span><span class="w">
</span><span class="o">.</span><span class="n">\ExchangeHound.ps1</span><span class="w"> </span><span class="nt">-CollectAll</span><span class="w"> </span><span class="nt">-OutputPath</span><span class="w"> </span><span class="o">.</span><span class="nx">\exchangehound_full.json</span><span class="w">
</span></code></pre></div></div>

<ol>
  <li><strong>Prepare BloodHound for OpenGraph data</strong>
    <ul>
      <li>Ensure your BloodHound deployment is using the PostgreSQL/OpenGraph path (PG) instead of Neo4j mode.</li>
      <li>Upload the ExchangeHound custom model before ingesting data, so custom nodes/edges render correctly.</li>
    </ul>
  </li>
</ol>

<div class="language-bash highlighter-rouge"><div class="highlight"><pre class="highlight"><code>python update_custom_nodes_to_bloodhound.py <span class="nt">-s</span> https://bloodhound.example.com <span class="nt">-u</span> &lt;user&gt; <span class="nt">-p</span> &lt;pass&gt; <span class="nt">-m</span> model.json
</code></pre></div></div>

<ol>
  <li><strong>Import ExchangeHound output</strong>
    <ul>
      <li><strong>GUI path</strong>: <code class="language-plaintext highlighter-rouge">Administration -&gt; File Ingest</code> and upload <code class="language-plaintext highlighter-rouge">ExchangeHound_*.json</code>.</li>
      <li><strong>Script/API path</strong>: use the uploader script for repeatable ingestion pipelines.</li>
    </ul>
  </li>
</ol>

<div class="language-bash highlighter-rouge"><div class="highlight"><pre class="highlight"><code>python upload_exchangehound_data_to_bloodhound.py <span class="nt">-s</span> https://bloodhound.example.com <span class="nt">-u</span> &lt;user&gt; <span class="nt">-p</span> &lt;pass&gt; <span class="nt">-f</span> ExchangeHound_YYYYMMDD_HHMMSS.json
</code></pre></div></div>

<p>More details can be found on the GitHub repository for ExchangeHound.</p>

<h2 id="threat-hunting-ideas">Threat Hunting Ideas</h2>

<p>Below are practical hunts based only on the data I’ve generated in my lab.</p>

<h3 id="1-non-owner-access-to-executive-mailboxes">1) Non-owner access to executive mailboxes</h3>

<p>Use this to find delegates with privileged access to executive mailboxes (<code class="language-plaintext highlighter-rouge">EthanColeman</code>, <code class="language-plaintext highlighter-rouge">NatalieParker</code>).</p>

<div class="language-cypher highlighter-rouge"><div class="highlight"><pre class="highlight"><code><span class="k">MATCH</span> <span class="n">p</span><span class="o">=</span><span class="ss">(</span><span class="n">delegate</span><span class="ss">)</span><span class="o">-</span><span class="ss">[</span><span class="nc">:HasFullAccess</span><span class="o">|</span><span class="n">HasSendAs</span><span class="o">|</span><span class="n">HasSendOnBehalf</span><span class="ss">]</span><span class="o">-&gt;</span><span class="ss">(</span><span class="py">mb:</span><span class="n">ExchangeMailbox</span><span class="ss">)</span><span class="o">&lt;-</span><span class="ss">[</span><span class="nc">:OwnsMailbox</span><span class="ss">]</span><span class="o">-</span><span class="ss">(</span><span class="py">owner:</span><span class="n">User</span><span class="ss">)</span>
<span class="k">WHERE</span> <span class="n">mb.displayname</span> <span class="ow">IN</span> <span class="ss">[</span><span class="s1">'EthanColeman'</span><span class="ss">,</span> <span class="s1">'NatalieParker'</span><span class="ss">]</span>
  <span class="ow">AND</span> <span class="n">delegate</span> <span class="o">&lt;&gt;</span> <span class="n">owner</span>
<span class="k">RETURN</span> <span class="n">p</span>
</code></pre></div></div>

<p><img src="/assets/images/exchangehound/th_1.png" alt="TH1" /></p>

<h3 id="2-kerberoastable-service-account-with-mailbox-control">
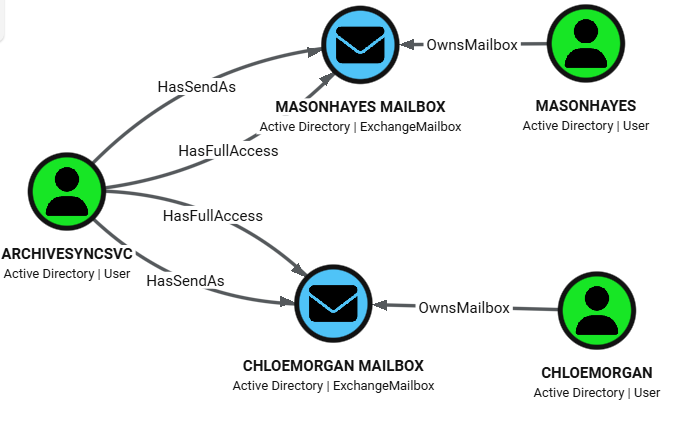
2) Kerberoastable service account with mailbox control</h3>

<p>Use this to identify principals with SPN set and mailbox takeover rights. <code class="language-plaintext highlighter-rouge">ArchiveSyncSvc</code> has both mailbox and impersonation-style rights to user mailboxes.</p>

<div class="language-cypher highlighter-rouge"><div class="highlight"><pre class="highlight"><code><span class="k">MATCH</span> <span class="n">p</span><span class="o">=</span><span class="ss">(</span><span class="py">u:</span><span class="n">User</span><span class="ss">)</span><span class="o">-</span><span class="ss">[</span><span class="nc">:HasFullAccess</span><span class="o">|</span><span class="n">HasSendAs</span><span class="ss">]</span><span class="o">-&gt;</span><span class="ss">(</span><span class="py">mb:</span><span class="n">ExchangeMailbox</span><span class="ss">)</span><span class="o">&lt;-</span><span class="ss">[</span><span class="nc">:OwnsMailbox</span><span class="ss">]</span><span class="o">-</span><span class="ss">(</span><span class="py">owner:</span><span class="n">User</span><span class="ss">)</span>
<span class="k">WHERE</span> <span class="n">u.hasspn</span>
<span class="k">RETURN</span> <span class="n">p</span>
</code></pre></div></div>

<p><img src="/assets/images/exchangehound/th_2.png" alt="TH2" /></p>

<h3 id="3-inbox-level-permissions-via-folder-acls">3) Inbox-level permissions via folder ACLs</h3>

<p>Use this to detect selective inbox monitoring (folder-level access) instead of full mailbox compromise.</p>

<div class="language-cypher highlighter-rouge"><div class="highlight"><pre class="highlight"><code><span class="k">MATCH</span> <span class="n">p</span><span class="o">=</span><span class="ss">(</span><span class="n">delegate</span><span class="ss">)</span><span class="o">-</span><span class="ss">[</span><span class="nc">:HasFolderAccess</span><span class="ss">]</span><span class="o">-&gt;</span><span class="ss">(</span><span class="py">folder:</span><span class="n">ExchangeMailboxFolder</span><span class="ss">)</span><span class="o">&lt;-</span><span class="ss">[</span><span class="nc">:ContainsFolder</span><span class="ss">]</span><span class="o">-</span><span class="ss">(</span><span class="py">mb:</span><span class="n">ExchangeMailbox</span><span class="ss">)</span><span class="o">&lt;-</span><span class="ss">[</span><span class="nc">:OwnsMailbox</span><span class="ss">]</span><span class="o">-</span><span class="ss">(</span><span class="py">owner:</span><span class="n">User</span><span class="ss">)</span>
<span class="k">WHERE</span> <span class="n">toLower</span><span class="ss">(</span><span class="nf">coalesce</span><span class="ss">(</span><span class="n">folder.folderpath</span><span class="ss">,</span> <span class="s1">''</span><span class="ss">))</span> <span class="ow">CONTAINS</span> <span class="s1">'inbox'</span>
<span class="k">RETURN</span> <span class="n">p</span>
</code></pre></div></div>

<p><img src="/assets/images/exchangehound/th_3.png" alt="TH3" /></p>

<h3 id="4-disabled-user-with-lingering-mailbox-rights-orphaned-access">
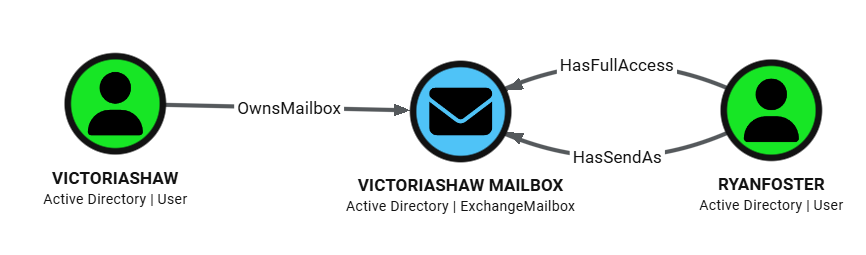
4) Disabled user with lingering mailbox rights (orphaned access)</h3>

<p>Use this to surface stale permissions from deprovisioning failures. In example <code class="language-plaintext highlighter-rouge">RyanFoster</code> is disabled but still delegated to <code class="language-plaintext highlighter-rouge">VictoriaShaw</code>.</p>

<div class="language-cypher highlighter-rouge"><div class="highlight"><pre class="highlight"><code><span class="k">MATCH</span> <span class="n">p</span><span class="o">=</span><span class="ss">(</span><span class="py">delegate:</span><span class="n">User</span><span class="ss">)</span><span class="o">-</span><span class="ss">[</span><span class="nc">:HasFullAccess</span><span class="o">|</span><span class="n">HasSendAs</span><span class="ss">]</span><span class="o">-&gt;</span><span class="ss">(</span><span class="py">mb:</span><span class="n">ExchangeMailbox</span><span class="ss">)</span><span class="o">&lt;-</span><span class="ss">[</span><span class="nc">:OwnsMailbox</span><span class="ss">]</span><span class="o">-</span><span class="ss">(</span><span class="py">owner:</span><span class="n">User</span><span class="ss">)</span>
<span class="k">WHERE</span> <span class="n">delegate.enabled</span> <span class="o">=</span> <span class="k">false</span>
<span class="k">RETURN</span> <span class="n">p</span>
</code></pre></div></div>

<p><img src="/assets/images/exchangehound/th_4.png" alt="TH4" /></p>

<h3 id="5-transport-rule-exfiltration-paths">5) Transport-rule exfiltration paths</h3>

<p>Use this to trace mail flow rules that route or copy messages to external endpoints.</p>

<div class="language-cypher highlighter-rouge"><div class="highlight"><pre class="highlight"><code><span class="k">MATCH</span> <span class="n">p</span><span class="o">=</span><span class="ss">(</span><span class="py">rule:</span><span class="n">ExchangeTransportRule</span><span class="ss">)</span><span class="o">-</span><span class="ss">[</span><span class="nc">:AffectsRecipient</span><span class="ss">]</span><span class="o">-&gt;</span><span class="ss">(</span><span class="py">endpoint:</span><span class="n">ExchangeTransportEndpoint</span><span class="ss">)</span>
<span class="k">RETURN</span> <span class="n">p</span>
</code></pre></div></div>

<p><img src="/assets/images/exchangehound/th_5.png" alt="TH5" /></p>

<h3 id="6-overly-privileged-exchange-rbac-roles-on-user-principals">6) Overly privileged Exchange RBAC roles on user principals</h3>

<p>Use this to identify users with high-impact Exchange administrative roles.</p>

<div class="language-cypher highlighter-rouge"><div class="highlight"><pre class="highlight"><code><span class="k">MATCH</span> <span class="n">p</span><span class="o">=</span><span class="ss">(</span><span class="py">principal:</span><span class="n">User</span><span class="ss">)</span><span class="o">-</span><span class="ss">[</span><span class="nc">:HasExchangeRole</span><span class="ss">]</span><span class="o">-&gt;</span><span class="ss">(</span><span class="py">role:</span><span class="n">ExchangeRbacRole</span><span class="ss">)</span>
<span class="k">WHERE</span> <span class="n">toLower</span><span class="ss">(</span><span class="nf">coalesce</span><span class="ss">(</span><span class="n">role.displayname</span><span class="ss">,</span> <span class="s1">''</span><span class="ss">))</span> <span class="ow">IN</span> <span class="ss">[</span>
    <span class="s1">'organization management'</span><span class="ss">,</span>
    <span class="s1">'recipient management'</span><span class="ss">,</span>
    <span class="s1">'role management'</span><span class="ss">,</span>
    <span class="s1">'organization configuration'</span><span class="ss">,</span>
    <span class="s1">'organization client access'</span><span class="ss">,</span>
    <span class="s1">'mail recipients'</span><span class="ss">,</span>
    <span class="s1">'mail recipient creation'</span><span class="ss">,</span>
    <span class="s1">'recipient policies'</span>
  <span class="ss">]</span>
<span class="k">RETURN</span> <span class="n">p</span>
</code></pre></div></div>

<p><img src="/assets/images/exchangehound/th_6.png" alt="TH6" /></p>

<h2 id="conclusion">Conclusion</h2>

<p>Publishing ExchangeHound on GitHub is an important milestone for me. It may not be perfect, but I hope it will be useful for investigations, especially after mailbox or Exchange Server compromise. I built it in my free time and tested it in a lab running Exchange 2019. I hope it also works well across other supported Exchange versions.</p>

<p>I may add Exchange Online support in my spare time.</p>

<ul>
  <li>ExchangeHound GitHub: <a href="https://github.com/FilipPwn/exchangehound">github.com/FilipPwn/exchangehound</a></li>
  <li>ExchangeHound sample data and scenarios: <a href="https://github.com/FilipPwn/exchangehound_samples">github.com/FilipPwn/exchangehound_samples</a></li>
</ul>]]></content><author><name>Filip Wozniak</name></author><category term="detection" /><category term="threat-hunting" /><category term="exchange" /><category term="bloodhound" /><category term="opengraph" /><category term="active-directory" /><summary type="html"><![CDATA[How ExchangeHound maps Exchange mailbox permissions into BloodHound OpenGraph.]]></summary></entry><entry><title type="html">Cybersecurity Certifications: My Journey and Thoughts</title><link href="https://filippwn.github.io/blog/2026/04/cybersecurity-certifications/" rel="alternate" type="text/html" title="Cybersecurity Certifications: My Journey and Thoughts" /><published>2026-04-16T00:00:00+00:00</published><updated>2026-04-16T00:00:00+00:00</updated><id>https://filippwn.github.io/blog/2026/04/cybersecurity-certifications</id><content type="html" xml:base="https://filippwn.github.io/blog/2026/04/cybersecurity-certifications/"><![CDATA[<h2 id="introduction">Introduction</h2>

<p>I’ve been working in the cybersecurity field for a few years now and during that time I’ve worked on a few certifications. Here’s the list of them, and later some thoughts about them.</p>

<h2 id="certifications">Certifications</h2>
<p>Important notes:</p>
<ul>
  <li>Some of these may be expired - I obtained them, I just didn’t always renew them 😄</li>
  <li>I’ve bought some of them, some of them were sponsored by my company</li>
</ul>

<p><strong>2022</strong></p>
<ul>
  <li>CompTIA: Security+</li>
  <li>Elastic: Certified Engineer</li>
  <li>Elastic: Certified Observability Engineer</li>
  <li>Elastic: Certified Analyst</li>
  <li>CompTIA: CySA+ (Cybersecurity Analyst)</li>
</ul>

<p><strong>2023</strong></p>
<ul>
  <li>GIAC: GCDA + SANS SEC555</li>
  <li>GIAC: GDAT + SANS SEC599</li>
</ul>

<p><strong>2024</strong></p>
<ul>
  <li>HackTheBox: CPTS (Certified Penetration Tester Specialist)</li>
  <li>Altered Security: CRTP (Red Team Professional)</li>
</ul>

<p><strong>2025</strong></p>
<ul>
  <li>HackTheBox: CAPE (Certified Active Directory Penetration Testing Expert)</li>
  <li>Altered Security: CRTE (Red Team Expert)</li>
  <li>HackTheBox: CWES (Certified Web Exploitation Specialist)</li>
  <li>OffSec: OSCP (Offensive Security Certified Professional)</li>
</ul>

<h2 id="thoughts">Thoughts</h2>

<h3 id="comptia-security">CompTIA Security+</h3>
<p>CompTIA Security+ was my first certification. I was fresh out of university and I wanted to validate my knowledge about general cybersecurity concepts. Security+ is a <strong>well-known and well-regarded</strong> certification in the industry. It covers a wide range of topics (<em>very broad, but not necessarily deep</em>). It can be considered a good starting point for someone who wants to start their journey in the cybersecurity field.</p>

<p>I prepared for this certification using mainly a <strong>Udemy course</strong> (videos + mock exams). Udemy is a good platform for self-paced learning and it is very affordable. I spent around <strong>2-3 weeks</strong> watching videos and writing notes. After that I took the exam - it is <strong>proctored</strong> and <strong>theory only</strong> (multiple choice questions). What stood out for me is that the exam uses very advanced English words and phrases, so it is also a good opportunity to practice your English.</p>

<p><strong>Pros:</strong></p>
<ul>
  <li>Good starting point for someone who wants to start their journey in the cybersecurity field</li>
  <li>Widely known and respected certification in the industry</li>
</ul>

<p><strong>Cons:</strong></p>
<ul>
  <li>Very broad, but not necessarily deep</li>
  <li>Not very practical</li>
  <li>Valid for 3 years</li>
</ul>

<h3 id="comptia-cysa">CompTIA CySA+</h3>
<p>CySA+ wasn’t a certification that was on my radar, but I got a pretty good discount for it - I think it was around <strong>80%</strong>, and it was a “beta” exam. I used the same strategy as for Security+ - Udemy course + mock exams. At that time I was already working in the cybersecurity field, so I had working knowledge about most of the topics covered in the exam - SIEM, IDS, IPS, investigations, incident response, threat intelligence, etc.
The exam was probably easier than Security+ - a bit deeper in security analysis, but still <em>very theoretical</em>.</p>

<p><strong>Pros:</strong></p>
<ul>
  <li>Good at a discount rate</li>
  <li>Quite easy exam</li>
</ul>

<p><strong>Cons:</strong></p>
<ul>
  <li>Not as well known as Security+</li>
  <li>Not very practical</li>
  <li>Valid for 3 years</li>
</ul>

<h3 id="elastic-certifications">Elastic Certifications</h3>
<p>I’ve done three Elastic certifications available at that time:</p>
<ul>
  <li>Elastic Certified Engineer</li>
  <li>Elastic Certified Observability Engineer</li>
  <li>Elastic Certified Analyst</li>
</ul>

<p>Elastic teaches <strong>practical skills</strong> and knowledge about <strong>Elastic Stack</strong> and its products. If you ever work with Elastic Stack as an engineer or architect, these training and certifications could be very beneficial for you.</p>

<p><strong>Engineer</strong> course teaches you mostly about Elasticsearch - how it works, how to use the API, working with indices, mapping, ingestion, search, aggregation, etc. The only thing missing, in my opinion, is how to deploy and scale your own Elasticsearch cluster.</p>

<p><strong>Observability</strong> course teaches you how Elastic can be used to monitor and analyze your logs, metrics, and traces for your applications - like nginx, apache etc. It also shows how things like APM or Heartbeat work.</p>

<p><strong>Analyst</strong> course was the easiest one - it teaches you how to use Kibana - visualizations, dashboards, maps etc.</p>

<p>All of the exams are <strong>proctored and practical</strong> - you have very limited time to complete around 10 tasks. You have to be really confident about what you are doing. Tip: <strong>know how to use Elastic docs</strong>.</p>

<p>I think that right now there is also another course: Elastic Certified Security Engineer, but I haven’t done it.</p>

<p><strong>Pros:</strong></p>
<ul>
  <li>Practical skills around Elastic Stack</li>
  <li>Beginner friendly</li>
</ul>

<p><strong>Cons:</strong></p>
<ul>
  <li>Probably only for Enterprise customers, I wouldn’t buy it by myself</li>
  <li>Good for beginners, but it is missing some advanced topics</li>
  <li>Valid for 3 years</li>
</ul>

<h3 id="giac-gcda">GIAC: GCDA</h3>
<p>SANS SEC555 and GCDA were my first SANS and GIAC courses. GCDA stands for <strong>GIAC Certified Detection Analyst</strong> - and that’s why I’ve done it, to become a detection engineer. At that time it was taught by <strong>Justin Henderson</strong> and I must say: I love this guy and his teaching style. I love his jokes and his way of explaining things. The course teaches how to start with detection engineering: how to choose and build a SIEM, make it “tactical”, how to feed it (and not overfeed it), how to use it, build detections / enrichments, etc. <em>This is probably the only course that will teach you that</em> - how to architect a SIEM solution in your enterprise. Great stuff, but for a great price too. Exam is proctored, but as with most typical GIAC exams - it is <strong>open-book</strong>.</p>

<p>Right now SEC555 is taught by another instructor, so I cannot say much about it.</p>

<p><strong>Pros:</strong></p>
<ul>
  <li>Must have for SIEM Architect / Detection Engineer</li>
  <li>Tons of practical knowledge about SIEM</li>
  <li>Probably the only course that will teach you how to architect a SIEM solution in your enterprise</li>
  <li>Based on Elastic Stack - very applicable in real-world</li>
</ul>

<p><strong>Cons:</strong></p>
<ul>
  <li>Expensive</li>
  <li>Valid for 3 years</li>
</ul>

<h3 id="giac-gdat">GIAC: GDAT</h3>
<p>SANS SEC599 was the second SANS course that I’ve done - with GDAT (<strong>GIAC Defending Advanced Threats</strong>) certification. It is designed to be a <strong>purple-team</strong> certification - you will learn how to emulate some threats and then how to defend against them. The course is very practical and is taught by experienced instructors. It was not as game-changing as GCDA, but it was a good supplement to my knowledge. To be honest, <em>most of the “red” stuff was really basic</em>, so do not expect to learn advanced red-team techniques. Exam was proctored, similar to other GIAC exams.</p>

<p><strong>Pros:</strong></p>
<ul>
  <li>Purple-team certification (only one in the industry?)</li>
  <li>Practical skills about red-team and purple-team</li>
  <li>Elastic Stack is used as a SIEM</li>
</ul>

<p><strong>Cons:</strong></p>
<ul>
  <li>Expensive</li>
  <li>Red-team stuff is really basic</li>
  <li>Valid for 3 years</li>
</ul>

<h3 id="hackthebox-cpts">HackTheBox: CPTS</h3>
<p>Here we go, my first HackTheBox course and certification. <strong>HackTheBox</strong> is probably the most popular and practical platform to learn cybersecurity skills. Their academy started a few years ago and it is a blast! Before that course, I wasn’t that self-confident about my pentesting skills. The course teaches you everything that a solid pentester should know: enumeration, exploitation, lateral movement, some web skills, some basic Active Directory attacks, some networking skills. All very applicable. To complete the course, you probably need a few weeks/months of dedicated study - but it is totally worth it. Very practical labs, up-to-date content and tools, great community (discord). The exam is <strong>not proctored</strong>, but it lasts <strong>10 days</strong> (I’ve personally used all that time). The report is mandatory, and it has to be a very professional one - probably need a whole day for it. Nevertheless, <strong>passing CPTS was a game-changer for me</strong>. It opened my eyes to the world of pentesting and I’ve started to love it.</p>

<p><strong>Pros:</strong></p>
<ul>
  <li>Inexpensive (silver subscription, annual - is enough)</li>
  <li>Most practical course about pentesting I’ve ever seen</li>
  <li>Up-to-date content</li>
  <li>Starting to grow in recognition</li>
  <li>Exam is a real pentest, and it is a real challenge</li>
</ul>

<p><strong>Cons:</strong></p>
<ul>
  <li>Not as recognized as OSCP</li>
</ul>

<h3 id="altered-security-crtp">Altered Security: CRTP</h3>
<p>Altered Security (led by <strong>Nikhil Mittal</strong>) specializes in Active Directory and Azure security. I wanted to go deeper in Active Directory security at that time, and HackTheBox CAPE was not available yet. What is good about CRTP is that it is a <strong>beginner-friendly</strong> course, quite inexpensive, and <strong>materials are for life</strong> (only lab time is limited). Material taught here is useful for both offensive and defensive operators. The course brings its own VM in cloud, available via Guacamole, which is very smooth. Exam is not proctored, but it is a realistic Active Directory pentest - ending with a report.</p>

<p><strong>Pros:</strong></p>
<ul>
  <li>Inexpensive</li>
  <li>Materials are for life and updated</li>
  <li>Great teacher</li>
  <li>Beginner friendly</li>
</ul>

<p><strong>Cons:</strong></p>
<ul>
  <li>Not that much recognized</li>
</ul>

<h3 id="hackthebox-cape">HackTheBox: CAPE</h3>
<p>Just after I’ve finished CRTP, HackTheBox released CAPE. It is a certificate for <strong>“seniors”</strong> in Active Directory security. The course is probably now <strong>the best in the industry</strong> - teaches advanced AD stuff like AD CS, basic Defense Evasion, advanced enumeration and so on. I’ve written a dedicated post for it here: <a href="https://filippwn.github.io/blog/2025/03/hackthebox-cape-certification/">HackTheBox CAPE Certification</a>. Exam is not proctored and lasts <strong>10 days</strong> - and it was the <strong>most challenging and rewarding exam</strong> that I’ve experienced so far. By the way - I was the <strong>10th person</strong> to pass it.</p>

<p><strong>Pros:</strong></p>
<ul>
  <li>Best course about AD security in the industry</li>
  <li>Exam is a real pentest, and it is a real challenge</li>
  <li>Report has to be professional and detailed</li>
  <li>AD CS attacks are covered</li>
</ul>

<p><strong>Cons:</strong></p>
<ul>
  <li>Not yet recognized that much</li>
</ul>

<h3 id="altered-security-crte">Altered Security: CRTE</h3>
<p>For Black Friday I decided to buy CRTE - a more advanced course than CRTP. I went through it at a faster pace and it is a bit more advanced. I was a bit disappointed that there was <em>not that much new stuff</em> compared to CRTP, but still I consider it a great course. Having already done CAPE - nothing surprised me that much.</p>

<p><strong>Pros:</strong></p>
<ul>
  <li>Inexpensive</li>
  <li>Materials are for life and updated</li>
  <li>Great teacher</li>
</ul>

<p><strong>Cons:</strong></p>
<ul>
  <li>Not that much recognized</li>
  <li>Not that much new stuff compared to CRTP</li>
</ul>

<h3 id="hackthebox-cwes">HackTheBox: CWES</h3>
<p>I’ve never been that interested in web exploitation, but since I finished the course path on HackTheBox Academy (<em>which is the best learning source imho</em>) I decided to give the exam a shot. Generally speaking - it is a beginner-friendly course for web exploitation. It teaches you the <strong>fundamentals of web exploitation</strong>, like SQL injection, XSS, CSRF, etc. These fundamentals will be useful for HackTheBox machines - if you play them. The only downside (at the time that I’ve done it) was there was a bit too much PHP, and a lack of other technologies covered.</p>

<p><strong>Pros:</strong></p>
<ul>
  <li>Inexpensive</li>
  <li>Great course for beginners</li>
  <li>Web fundamentals are useful for HackTheBox machines</li>
</ul>

<p><strong>Cons:</strong></p>
<ul>
  <li>A bit too much of PHP</li>
  <li>Not that much recognized</li>
</ul>

<h3 id="offsec-oscp">OffSec: OSCP</h3>
<p>OSCP is one of the <strong>most recognized certifications</strong> in the industry (probably next to CISSP). I did it because I had the opportunity and it is always good to have OSCP on your resume. Since I had already completed three HTB certifications at that time - I was confident to finish it without a course. I cannot speak about the course itself, but the exam was <strong>proctored, challenging and rewarding</strong>. Good to be OSCP-certified.</p>

<p><strong>Pros:</strong></p>
<ul>
  <li>Most recognized certification in the industry</li>
  <li>Practical</li>
  <li>OSCP does not expire</li>
</ul>

<p><strong>Cons:</strong></p>
<ul>
  <li>OSCP+ expires</li>
  <li>Expensive</li>
  <li>Losing its legendary status in recent years (my opinion)</li>
</ul>

<h2 id="conclusion">Conclusion</h2>

<p>Looking back at this list, I realize how much the <strong>journey itself</strong> shaped my thinking — not just the certificates at the end of it.</p>

<p>If I had to give one piece of advice: don’t chase certifications for the badge. <strong>Chase them for the gaps they fill.</strong> Security+ was right for where I was in 2022. CAPE was right for where I wanted to go in 2025. The order matters, and so does the intent.</p>

<p>A few things I’ve learned along the way:</p>

<ul>
  <li><strong>Practical &gt; theoretical.</strong> Every time. If the exam doesn’t involve actually breaking or building something, its value is limited.</li>
  <li><strong>Blue teamers should go red.</strong> Not to switch sides, but to understand what you’re defending against. CPTS changed how I think about detections more than any blue team course ever did.</li>
  <li><strong>Expensive doesn’t mean better.</strong> SANS is excellent, but so is HackTheBox Academy at a fraction of the cost. Know what you’re paying for.</li>
  <li><strong>Recognition is overrated — until it isn’t.</strong> OSCP still opens doors. CAPE is getting there. But at the end of the day, <em>what matters is what you can actually do</em>.</li>
</ul>

<p><em>Still a few things on the list. The journey continues.</em></p>]]></content><author><name>Filip Wozniak</name></author><category term="certification" /><summary type="html"><![CDATA[My journey and thoughts about cybersecurity certifications.]]></summary></entry><entry><title type="html">Enrich Your SIEM Data with Spur, Part 1 - Theoretical Introduction</title><link href="https://filippwn.github.io/blog/2026/04/enrich-your-data-with-spur/" rel="alternate" type="text/html" title="Enrich Your SIEM Data with Spur, Part 1 - Theoretical Introduction" /><published>2026-04-16T00:00:00+00:00</published><updated>2026-04-16T00:00:00+00:00</updated><id>https://filippwn.github.io/blog/2026/04/enrich-your-data-with-spur</id><content type="html" xml:base="https://filippwn.github.io/blog/2026/04/enrich-your-data-with-spur/"><![CDATA[<h2 id="introduction">Introduction</h2>

<p>When an IP address shows up in your SIEM — in a login event, a firewall log, a VPN connection — you typically get just that: an IP address. If you use GeoIP enrichment, you get geolocation (Country, City) and ASN. But that is often not enough in investigations. The question that follows is usually: <em>who is actually behind this IP? Is it a VPN? A proxy?</em></p>

<p>That’s where <a href="https://spur.us">Spur</a> comes in.</p>

<p><strong>Spur</strong> is a threat intelligence feed focused on <strong>anonymous infrastructure detection</strong>. In plain terms: it tells you whether a given IP address belongs to a VPN, a proxy, a residential proxy network, a Tor exit node, or some other anonymization service. This kind of context is invaluable for investigations and threat hunting — a successful authentication attempt from a residential proxy commonly abused by a cybercrime group should raise some alerts.</p>

<h3 id="what-spur-offers">What Spur offers</h3>

<p>Spur’s core product is an <strong>IP intelligence feed</strong> that is continuously updated and covers:</p>

<ul>
  <li><strong>VPN detection</strong> — identifies IPs associated with commercial VPN providers (NordVPN, ExpressVPN, Mullvad, etc.), including the provider name</li>
  <li><strong>Residential proxies</strong> — flags IPs that are part of residential proxy networks, where traffic is routed through real consumer devices</li>
  <li><strong>Anonymous proxies</strong> — datacenter-based proxies and anonymization services</li>
  <li><strong>Tor exit nodes</strong> — identifies Tor exit nodes at query time</li>
  <li><strong>Hosting / datacenter classification</strong> — distinguishes between consumer and infrastructure IPs</li>
  <li><strong>Geographic and ASN context</strong> — enriched location and autonomous system data</li>
</ul>

<p>Each IP entry in Spur’s data includes structured tags and metadata — not just a binary “yes/no” flag, but the type of anonymization, the service name where known, and confidence indicators.</p>

<h3 id="why-vpn-enrichment-matters-for-detection">Why VPN enrichment matters for detection</h3>

<p>Most SIEMs ingest IP addresses as-is. Geolocation alone is not enough — a VPN exit node in Germany looks identical to a legitimate German user at the IP level. Spur bridges that gap.</p>

<p><img src="/assets/images/spur/surfshark.png" alt="Spur SurfsharkVPN" /></p>

<p>With Spur enrichment in place, you can:</p>

<ul>
  <li><strong>Enrich authentication logs</strong> to flag logins from known VPN or proxy IPs</li>
  <li><strong>Build targeted detection rules</strong> — e.g., alert when a user authenticates from a VPN exit node they’ve never used before</li>
  <li><strong>Reduce false positives</strong> by understanding <em>why</em> an IP looks suspicious (residential proxy vs. bulletproof hosting vs. Tor)</li>
  <li><strong>Feed threat hunting workflows</strong> with structured anonymization context, not just raw IP reputation scores</li>
</ul>

<p><img src="/assets/images/spur/actmobile_vpn.png" alt="Spur ActMobileVPN" /></p>

<h3 id="pricing">Pricing</h3>

<p><strong>Important note: Spur is a paid service.</strong> Free users get only <strong>250 manual lookups per month</strong> — enough for ad-hoc investigations, not for automated enrichment. API access for bulk/automated use starts at <strong>$200/month</strong>.</p>

<p>If you’re evaluating it, the free tier is good enough to explore the data model and validate threat hunting ideas before committing.</p>

<h2 id="understanding-the-spur-data-model">Understanding the Spur data model</h2>

<p>Before jumping into threat hunting ideas, it’s worth understanding what Spur actually returns for an IP. Here’s an example response:</p>

<div class="language-json highlighter-rouge"><div class="highlight"><pre class="highlight"><code><span class="p">{</span><span class="w">
  </span><span class="nl">"ip"</span><span class="p">:</span><span class="w"> </span><span class="s2">"45.88.190.70"</span><span class="p">,</span><span class="w">
  </span><span class="nl">"infrastructure"</span><span class="p">:</span><span class="w"> </span><span class="s2">"DATACENTER"</span><span class="p">,</span><span class="w">
  </span><span class="nl">"organization"</span><span class="p">:</span><span class="w"> </span><span class="s2">"Packethub S.A."</span><span class="p">,</span><span class="w">
  </span><span class="nl">"as"</span><span class="p">:</span><span class="w"> </span><span class="p">{</span><span class="w">
    </span><span class="nl">"number"</span><span class="p">:</span><span class="w"> </span><span class="mi">147049</span><span class="p">,</span><span class="w">
    </span><span class="nl">"organization"</span><span class="p">:</span><span class="w"> </span><span class="s2">"PacketHub S.A."</span><span class="w">
  </span><span class="p">},</span><span class="w">
  </span><span class="nl">"location"</span><span class="p">:</span><span class="w"> </span><span class="p">{</span><span class="w">
    </span><span class="nl">"city"</span><span class="p">:</span><span class="w"> </span><span class="s2">"Montreal"</span><span class="p">,</span><span class="w">
    </span><span class="nl">"country"</span><span class="p">:</span><span class="w"> </span><span class="s2">"CA"</span><span class="p">,</span><span class="w">
    </span><span class="nl">"state"</span><span class="p">:</span><span class="w"> </span><span class="s2">"Quebec"</span><span class="w">
  </span><span class="p">},</span><span class="w">
  </span><span class="nl">"tunnels"</span><span class="p">:</span><span class="w"> </span><span class="p">[</span><span class="w">
    </span><span class="p">{</span><span class="w">
      </span><span class="nl">"anonymous"</span><span class="p">:</span><span class="w"> </span><span class="kc">true</span><span class="p">,</span><span class="w">
      </span><span class="nl">"operator"</span><span class="p">:</span><span class="w"> </span><span class="s2">"NORD_VPN"</span><span class="p">,</span><span class="w">
      </span><span class="nl">"type"</span><span class="p">:</span><span class="w"> </span><span class="s2">"VPN"</span><span class="w">
    </span><span class="p">}</span><span class="w">
  </span><span class="p">],</span><span class="w">
  </span><span class="nl">"risks"</span><span class="p">:</span><span class="w"> </span><span class="p">[</span><span class="w">
    </span><span class="s2">"CALLBACK_PROXY"</span><span class="p">,</span><span class="w">
    </span><span class="s2">"TUNNEL"</span><span class="w">
  </span><span class="p">],</span><span class="w">
  </span><span class="nl">"client"</span><span class="p">:</span><span class="w"> </span><span class="p">{</span><span class="w">
    </span><span class="nl">"behaviors"</span><span class="p">:</span><span class="w"> </span><span class="p">[</span><span class="s2">"FILE_SHARING"</span><span class="p">],</span><span class="w">
    </span><span class="nl">"count"</span><span class="p">:</span><span class="w"> </span><span class="mi">2</span><span class="p">,</span><span class="w">
    </span><span class="nl">"proxies"</span><span class="p">:</span><span class="w"> </span><span class="p">[</span><span class="s2">"IPIDEA_PROXY"</span><span class="p">,</span><span class="w"> </span><span class="s2">"NETNUT_PROXY"</span><span class="p">],</span><span class="w">
    </span><span class="nl">"types"</span><span class="p">:</span><span class="w"> </span><span class="p">[</span><span class="s2">"MOBILE"</span><span class="p">]</span><span class="w">
  </span><span class="p">}</span><span class="w">
</span><span class="p">}</span><span class="w">
</span></code></pre></div></div>

<p>The fields that matter most for detection:</p>

<ul>
  <li><strong><code class="language-plaintext highlighter-rouge">tunnels</code></strong> — the core of Spur’s value. Contains the anonymization type (<code class="language-plaintext highlighter-rouge">VPN</code>, <code class="language-plaintext highlighter-rouge">TOR</code>, <code class="language-plaintext highlighter-rouge">PROXY</code>, <code class="language-plaintext highlighter-rouge">REMOTE_DESKTOP</code>) and the <code class="language-plaintext highlighter-rouge">operator</code> name (e.g., <code class="language-plaintext highlighter-rouge">NORD_VPN</code>, <code class="language-plaintext highlighter-rouge">PROTON_VPN</code>). This is what lets you identify <em>which</em> VPN service is in use, not just that a tunnel exists.</li>
  <li><strong><code class="language-plaintext highlighter-rouge">infrastructure</code></strong> — the type of infrastructure behind the IP. Documented values include <code class="language-plaintext highlighter-rouge">DATACENTER</code>, <code class="language-plaintext highlighter-rouge">MOBILE</code>, <code class="language-plaintext highlighter-rouge">SATELLITE</code>. IPs in the residential proxy feed will have <code class="language-plaintext highlighter-rouge">client.proxies</code> populated regardless of infrastructure type.</li>
  <li><strong><code class="language-plaintext highlighter-rouge">risks</code></strong> — a list of risk tags associated with the IP. Confirmed values: <code class="language-plaintext highlighter-rouge">TUNNEL</code>, <code class="language-plaintext highlighter-rouge">CALLBACK_PROXY</code>, <code class="language-plaintext highlighter-rouge">GEO_MISMATCH</code>, <code class="language-plaintext highlighter-rouge">LOGIN_BRUTEFORCE</code>. Useful for building tiered alert severity.</li>
  <li><strong><code class="language-plaintext highlighter-rouge">client.types</code></strong> — what kind of device/client is typically seen on this IP. Documented values: <code class="language-plaintext highlighter-rouge">MOBILE</code>, <code class="language-plaintext highlighter-rouge">DESKTOP</code>.</li>
  <li><strong><code class="language-plaintext highlighter-rouge">client.behaviors</code></strong> — behavioral patterns observed from this IP. Documented values include <code class="language-plaintext highlighter-rouge">FILE_SHARING</code>, <code class="language-plaintext highlighter-rouge">TOR_PROXY_USER</code>.</li>
</ul>

<h2 id="threat-hunting-with-spur">Threat Hunting with Spur</h2>

<p>Below are a few ideas that are easy to operationalize once you have the feed integrated into your SIEM.</p>

<h3 id="th-idea-1--correlate-logons-with-vpn--proxy-provider">TH Idea 1 — Correlate logons with VPN / Proxy provider</h3>

<p>The idea is simple. Let’s say that from threat intelligence you know an adversary uses NordVPN to perform password spraying against your service. Using Spur, you can easily spot both legitimate users using NordVPN on a daily basis and the adversary doing the same. They can switch countries, cities — but <code class="language-plaintext highlighter-rouge">tunnels.operator</code> will always tell you the truth.</p>

<p>Connection using NordVPN from Canada:</p>
<div class="language-json highlighter-rouge"><div class="highlight"><pre class="highlight"><code><span class="p">{</span><span class="w">
  </span><span class="nl">"ip"</span><span class="p">:</span><span class="w"> </span><span class="s2">"45.88.190.70"</span><span class="p">,</span><span class="w">
  </span><span class="nl">"location"</span><span class="p">:</span><span class="w"> </span><span class="p">{</span><span class="w"> </span><span class="nl">"city"</span><span class="p">:</span><span class="w"> </span><span class="s2">"Montreal"</span><span class="p">,</span><span class="w"> </span><span class="nl">"country"</span><span class="p">:</span><span class="w"> </span><span class="s2">"CA"</span><span class="w"> </span><span class="p">},</span><span class="w">
  </span><span class="nl">"tunnels"</span><span class="p">:</span><span class="w"> </span><span class="p">[{</span><span class="w"> </span><span class="nl">"operator"</span><span class="p">:</span><span class="w"> </span><span class="s2">"NORD_VPN"</span><span class="p">,</span><span class="w"> </span><span class="nl">"type"</span><span class="p">:</span><span class="w"> </span><span class="s2">"VPN"</span><span class="p">,</span><span class="w"> </span><span class="nl">"anonymous"</span><span class="p">:</span><span class="w"> </span><span class="kc">true</span><span class="w"> </span><span class="p">}]</span><span class="w">
</span><span class="p">}</span><span class="w">
</span></code></pre></div></div>

<p>Same adversary, switched to UK:</p>
<div class="language-json highlighter-rouge"><div class="highlight"><pre class="highlight"><code><span class="p">{</span><span class="w">
  </span><span class="nl">"ip"</span><span class="p">:</span><span class="w"> </span><span class="s2">"188.241.144.125"</span><span class="p">,</span><span class="w">
  </span><span class="nl">"location"</span><span class="p">:</span><span class="w"> </span><span class="p">{</span><span class="w"> </span><span class="nl">"city"</span><span class="p">:</span><span class="w"> </span><span class="s2">"London"</span><span class="p">,</span><span class="w"> </span><span class="nl">"country"</span><span class="p">:</span><span class="w"> </span><span class="s2">"GB"</span><span class="w"> </span><span class="p">},</span><span class="w">
  </span><span class="nl">"tunnels"</span><span class="p">:</span><span class="w"> </span><span class="p">[{</span><span class="w"> </span><span class="nl">"operator"</span><span class="p">:</span><span class="w"> </span><span class="s2">"NORD_VPN"</span><span class="p">,</span><span class="w"> </span><span class="nl">"type"</span><span class="p">:</span><span class="w"> </span><span class="s2">"VPN"</span><span class="p">,</span><span class="w"> </span><span class="nl">"anonymous"</span><span class="p">:</span><span class="w"> </span><span class="kc">true</span><span class="w"> </span><span class="p">}]</span><span class="w">
</span><span class="p">}</span><span class="w">
</span></code></pre></div></div>

<p>The IP, country, and ASN all changed. But <code class="language-plaintext highlighter-rouge">tunnels.operator</code> is <code class="language-plaintext highlighter-rouge">NORD_VPN</code> in both cases. Without Spur, these look like two unrelated IPs from two different countries. With Spur, it’s the same pattern.</p>

<p>This is especially powerful when combined with user-level context — if a user suddenly authenticates from a VPN provider they’ve never used before, that’s a much stronger signal than just “new country.”</p>

<h3 id="th-idea-2--residential-proxy-detection-for-account-takeover">TH Idea 2 — Residential proxy detection for account takeover</h3>

<p>Residential proxies are a favourite tool for account takeover attacks. Unlike datacenter VPNs, residential proxies route traffic through real consumer devices — making them much harder to block by IP reputation alone. GeoIP won’t help you here: the IP looks like a legitimate home user in the same country.</p>

<p>Spur exposes this through the <code class="language-plaintext highlighter-rouge">client.proxies</code> field, which lists residential proxy operators associated with the IP. A login from a residential proxy in the user’s own country, at an unusual hour, is a very different risk profile than a plain residential IP.</p>

<p>Hunting idea: look for authentication events where <code class="language-plaintext highlighter-rouge">spur.client.proxies</code> is not empty. Enrich further with login history — a first-time residential proxy login for a given user is worth investigating.</p>

<h3 id="th-idea-3--risk-tags-as-a-tiered-alert-signal">TH Idea 3 — Risk tags as a tiered alert signal</h3>

<p>Spur’s <code class="language-plaintext highlighter-rouge">risks</code> array lets you build detection rules with graduated severity rather than binary flags. Here’s some of the values to look at:</p>

<table>
  <thead>
    <tr>
      <th>Risk tag</th>
      <th>What it means</th>
    </tr>
  </thead>
  <tbody>
    <tr>
      <td><code class="language-plaintext highlighter-rouge">TUNNEL</code></td>
      <td>IP is a VPN or proxy exit node</td>
    </tr>
    <tr>
      <td><code class="language-plaintext highlighter-rouge">GEO_MISMATCH</code></td>
      <td>Declared location differs from actual infrastructure location</td>
    </tr>
    <tr>
      <td><code class="language-plaintext highlighter-rouge">CALLBACK_PROXY</code></td>
      <td>IP is used as a callback proxy (often malware C2)</td>
    </tr>
    <tr>
      <td><code class="language-plaintext highlighter-rouge">LOGIN_BRUTEFORCE</code></td>
      <td>IP has been observed performing login brute force attacks</td>
    </tr>
  </tbody>
</table>

<p>This lets you avoid the “everything is suspicious” trap — a plain <code class="language-plaintext highlighter-rouge">TUNNEL</code> flag on a login may just be a privacy-conscious user, while <code class="language-plaintext highlighter-rouge">LOGIN_BRUTEFORCE</code> + <code class="language-plaintext highlighter-rouge">CALLBACK_PROXY</code> on the same IP warrants immediate investigation. As you ingest Spur data, you’ll encounter additional tags — treat them as enrichment signals and build severity tiers based on what you observe in your own environment.</p>

<h2 id="whats-next">What’s next</h2>

<p>In <strong>Part 2</strong>, I’ll walk through how to integrate Spur’s data feed into <strong>Elastic SIEM</strong> — downloading the feed, parsing it, setting up an ingest pipeline, and building the enrichment processor so these fields are automatically added to your logs at query time.</p>]]></content><author><name>Filip Wozniak</name></author><category term="detection" /><category term="monitoring" /><category term="siem" /><category term="enrichment" /><category term="elastic" /><summary type="html"><![CDATA[How to enrich your SIEM data with Spur - a tool that allows you to enrich your data with external data sources. Part 1 - Theoretical Introduction.]]></summary></entry><entry><title type="html">Beyond Detection Rules: Agents Healthchecks</title><link href="https://filippwn.github.io/blog/2026/04/beyond-detection-rules-whisperer/" rel="alternate" type="text/html" title="Beyond Detection Rules: Agents Healthchecks" /><published>2026-04-15T00:00:00+00:00</published><updated>2026-04-15T00:00:00+00:00</updated><id>https://filippwn.github.io/blog/2026/04/beyond-detection-rules-whisperer</id><content type="html" xml:base="https://filippwn.github.io/blog/2026/04/beyond-detection-rules-whisperer/"><![CDATA[<h2 id="introduction">Introduction</h2>

<p>Enterprise defenders often have many agents running in the environment: SIEM, EDR, VPN, you name it. 
Having 100% of the agents running and healthy is a dream of every defender, but the reality is that it’s not always possible.
Sometimes agents are broken: never installed, stopped by some administrator or just not working as expected.</p>

<p>It is a great idea to have a healthcheck for your agents to ensure that they are running and healthy.</p>

<h2 id="introducing-the-whisperer">Introducing the Whisperer</h2>
<p>One day I was thinking if it would be possible to know how many agents are running and healthy in the environment. How many are stopped? How many are not installed? How many are working as expected?
I started to think about it and I came up with the idea of a Whisperer.</p>

<p>The Whisperer is just a simple PowerShell script deployed in Active Directory environment using Group Policy.
Script is running in scheduled task: running 10 minutes after the power on and once a day around noon.</p>

<p>Script is using PowerShell to pull the status of the agents from computer, checking if their service is running, their versions, etc. 
Additionally it is sending some useful information like: Microsoft Defender (status of updates, exclusions etc.), and system info (version, patch). We could add more things if we would like to.</p>

<h2 id="powershell-script">PowerShell script</h2>
<p>Proof of concept PowerShell script is available <a href="https://github.com/FilipPwn/whisperer/blob/main/whisperer.ps1">here</a>.
It basically does the following:</p>
<ul>
  <li>Collects basic host information: hostname, domain, OS name, version, build number, install date and last boot time.</li>
  <li>Queries the status and version of key security agents: Elastic Agent, Elastic Endpoint, and Sysmon (we can configure other agents to be checked if we would like to).</li>
  <li>Pulls hardware and BIOS details for inventory purposes.</li>
  <li>Retrieves Microsoft Defender status, including definitions update state and configured exclusions.</li>
  <li>Ships everything as a single JSON payload via an authenticated HTTP POST to the Whisperer receiver endpoint.</li>
</ul>

<h2 id="deployment-using-group-policy">Deployment using Group Policy</h2>
<p>Deployment is straightforward using a GPO scheduled task. I won’t go into full GPO configuration here, but the key points are:</p>
<ul>
  <li>Run as <code class="language-plaintext highlighter-rouge">SYSTEM</code> — no user interaction required.</li>
  <li>Trigger on startup (with a 10-minute delay to allow network stabilisation) and daily at noon (we can add some jitter to the time to avoid overloading the network).</li>
  <li>Script is stored in SYSVOL and is accessible from the machine account.</li>
  <li>Consider code-signing the script if your environment enforces PowerShell execution policy.</li>
</ul>

<h2 id="elastic-stack-integration">Elastic Stack integration</h2>
<p>The script sends data to a simple HTTP listener — in my case, I’ve used Elastic Stack integration. I’ve added Basic Authentication to the endpoint to ensure that only the Whisperer can send data to the endpoint.
<img src="/assets/images/whisperer/http_endpoint_integration.png" alt="Elastic Stack integration" /></p>

<p>Full configuration of integration:</p>
<div class="language-json highlighter-rouge"><div class="highlight"><pre class="highlight"><code><span class="err">PUT</span><span class="w"> </span><span class="err">kbn:/api/fleet/package_policies/whisperer-package-policy</span><span class="w">
</span><span class="p">{</span><span class="w">
  </span><span class="nl">"package"</span><span class="p">:</span><span class="w"> </span><span class="p">{</span><span class="w">
    </span><span class="nl">"name"</span><span class="p">:</span><span class="w"> </span><span class="s2">"http_endpoint"</span><span class="p">,</span><span class="w">
    </span><span class="nl">"version"</span><span class="p">:</span><span class="w"> </span><span class="s2">"2.5.0"</span><span class="w">
  </span><span class="p">},</span><span class="w">
  </span><span class="nl">"name"</span><span class="p">:</span><span class="w"> </span><span class="s2">"whisperer"</span><span class="p">,</span><span class="w">
  </span><span class="nl">"namespace"</span><span class="p">:</span><span class="w"> </span><span class="s2">""</span><span class="p">,</span><span class="w">
  </span><span class="nl">"description"</span><span class="p">:</span><span class="w"> </span><span class="s2">""</span><span class="p">,</span><span class="w">
  </span><span class="nl">"policy_ids"</span><span class="p">:</span><span class="w"> </span><span class="p">[</span><span class="w">
    </span><span class="s2">"whisperer-server-policy"</span><span class="w">
  </span><span class="p">],</span><span class="w">
  </span><span class="nl">"vars"</span><span class="p">:</span><span class="w"> </span><span class="p">{},</span><span class="w">
  </span><span class="nl">"inputs"</span><span class="p">:</span><span class="w"> </span><span class="p">{</span><span class="w">
    </span><span class="nl">"http_endpoint-http_endpoint"</span><span class="p">:</span><span class="w"> </span><span class="p">{</span><span class="w">
      </span><span class="nl">"enabled"</span><span class="p">:</span><span class="w"> </span><span class="kc">true</span><span class="p">,</span><span class="w">
      </span><span class="nl">"streams"</span><span class="p">:</span><span class="w"> </span><span class="p">{</span><span class="w">
        </span><span class="nl">"http_endpoint.http_endpoint"</span><span class="p">:</span><span class="w"> </span><span class="p">{</span><span class="w">
          </span><span class="nl">"enabled"</span><span class="p">:</span><span class="w"> </span><span class="kc">true</span><span class="p">,</span><span class="w">
          </span><span class="nl">"vars"</span><span class="p">:</span><span class="w"> </span><span class="p">{</span><span class="w">
            </span><span class="nl">"method"</span><span class="p">:</span><span class="w"> </span><span class="s2">"POST"</span><span class="p">,</span><span class="w">
            </span><span class="nl">"listen_address"</span><span class="p">:</span><span class="w"> </span><span class="s2">"0.0.0.0"</span><span class="p">,</span><span class="w">
            </span><span class="nl">"listen_port"</span><span class="p">:</span><span class="w"> </span><span class="s2">"12345"</span><span class="p">,</span><span class="w">
            </span><span class="nl">"data_stream.dataset"</span><span class="p">:</span><span class="w"> </span><span class="s2">"whisperer"</span><span class="p">,</span><span class="w">
            </span><span class="nl">"pipeline"</span><span class="p">:</span><span class="w"> </span><span class="s2">"whisperer"</span><span class="p">,</span><span class="w">
            </span><span class="nl">"preserve_original_event"</span><span class="p">:</span><span class="w"> </span><span class="kc">false</span><span class="p">,</span><span class="w">
            </span><span class="nl">"basic_auth"</span><span class="p">:</span><span class="w"> </span><span class="kc">true</span><span class="p">,</span><span class="w">
            </span><span class="nl">"username"</span><span class="p">:</span><span class="w"> </span><span class="s2">"whisperer"</span><span class="p">,</span><span class="w">
            </span><span class="nl">"password"</span><span class="p">:</span><span class="w"> </span><span class="p">{</span><span class="w">
              </span><span class="nl">"id"</span><span class="p">:</span><span class="w"> </span><span class="s2">"2ebXkZ0B83xKn-wv4Mzj"</span><span class="p">,</span><span class="w">
              </span><span class="nl">"isSecretRef"</span><span class="p">:</span><span class="w"> </span><span class="kc">true</span><span class="w">
            </span><span class="p">},</span><span class="w">
            </span><span class="nl">"include_headers"</span><span class="p">:</span><span class="w"> </span><span class="p">[],</span><span class="w">
            </span><span class="nl">"ssl"</span><span class="p">:</span><span class="w"> </span><span class="s2">"enabled: false</span><span class="se">\n</span><span class="s2">certificate: </span><span class="se">\"</span><span class="s2">/etc/pki/client/cert.pem</span><span class="se">\"\n</span><span class="s2">key: </span><span class="se">\"</span><span class="s2">/etc/pki/client/cert.key</span><span class="se">\"\n</span><span class="s2">"</span><span class="p">,</span><span class="w">
            </span><span class="nl">"tags"</span><span class="p">:</span><span class="w"> </span><span class="p">[]</span><span class="w">
          </span><span class="p">}</span><span class="w">
        </span><span class="p">}</span><span class="w">
      </span><span class="p">}</span><span class="w">
    </span><span class="p">}</span><span class="w">
  </span><span class="p">}</span><span class="w">
</span><span class="p">}</span><span class="w">
</span></code></pre></div></div>

<p>I’ve also added a pipeline to the integration to parse the JSON payload and extract the relevant information.</p>
<div class="language-json highlighter-rouge"><div class="highlight"><pre class="highlight"><code><span class="err">PUT</span><span class="w"> </span><span class="err">_ingest/pipeline/whisperer</span><span class="w">
</span><span class="p">{</span><span class="w">
  </span><span class="nl">"description"</span><span class="p">:</span><span class="w"> </span><span class="s2">"Whisperer endpoint inventory pipeline"</span><span class="p">,</span><span class="w">
  </span><span class="nl">"processors"</span><span class="p">:</span><span class="w"> </span><span class="p">[</span><span class="w">
    </span><span class="p">{</span><span class="w">
      </span><span class="nl">"rename"</span><span class="p">:</span><span class="w"> </span><span class="p">{</span><span class="w">
        </span><span class="nl">"field"</span><span class="p">:</span><span class="w"> </span><span class="s2">"json"</span><span class="p">,</span><span class="w">
        </span><span class="nl">"target_field"</span><span class="p">:</span><span class="w"> </span><span class="s2">"whisperer"</span><span class="p">,</span><span class="w">
        </span><span class="nl">"ignore_missing"</span><span class="p">:</span><span class="w"> </span><span class="kc">true</span><span class="w">
      </span><span class="p">}</span><span class="w">
    </span><span class="p">},</span><span class="w">
    </span><span class="p">{</span><span class="w">
      </span><span class="nl">"script"</span><span class="p">:</span><span class="w"> </span><span class="p">{</span><span class="w">
        </span><span class="nl">"description"</span><span class="p">:</span><span class="w"> </span><span class="s2">"Convert WMI /Date(epoch)/ to ISO8601"</span><span class="p">,</span><span class="w">
        </span><span class="nl">"lang"</span><span class="p">:</span><span class="w"> </span><span class="s2">"painless"</span><span class="p">,</span><span class="w">
        </span><span class="nl">"source"</span><span class="p">:</span><span class="w"> </span><span class="s2">"""
          def fields = [
            ['whisperer', 'mpstatus', 'AntivirusSignatureLastUpdated'],
            ['whisperer', 'mpstatus', 'AntispywareSignatureLastUpdated'],
            ['whisperer', 'mpstatus', 'NISSignatureLastUpdated'],
            ['whisperer', 'mpstatus', 'DeviceControlPoliciesLastUpdated']
          ];
          for (def path : fields) {
            def obj = ctx;
            for (int i = 0; i &lt; path.length - 1; i++) {
              if (obj == null || !(obj instanceof Map) || !obj.containsKey(path[i])) { obj = null; break; }
              obj = obj[path[i]];
            }
            if (obj == null) continue;
            def lastKey = path[path.length - 1];
            if (!obj.containsKey(lastKey) || obj[lastKey] == null) continue;
            def val = obj[lastKey].toString();
            def m = /</span><span class="se">\/</span><span class="s2">Date</span><span class="se">\(</span><span class="s2">(-?</span><span class="se">\d</span><span class="s2">+)</span><span class="se">\)\/</span><span class="s2">/.matcher(val);
            if (m.find()) {
              long epoch = Long.parseLong(m.group(1));
              obj[lastKey] = epoch &gt; 0 ? Instant.ofEpochMilli(epoch).toString() : null;
            }
          }
        """</span><span class="w">
      </span><span class="p">}</span><span class="w">
    </span><span class="p">},</span><span class="w">
    </span><span class="p">{</span><span class="w">
      </span><span class="nl">"date"</span><span class="p">:</span><span class="w"> </span><span class="p">{</span><span class="w">
        </span><span class="nl">"field"</span><span class="p">:</span><span class="w"> </span><span class="s2">"whisperer.created_at"</span><span class="p">,</span><span class="w">
        </span><span class="nl">"target_field"</span><span class="p">:</span><span class="w"> </span><span class="s2">"@timestamp"</span><span class="p">,</span><span class="w">
        </span><span class="nl">"formats"</span><span class="p">:</span><span class="w"> </span><span class="p">[</span><span class="s2">"ISO8601"</span><span class="p">],</span><span class="w">
        </span><span class="nl">"ignore_failure"</span><span class="p">:</span><span class="w"> </span><span class="kc">true</span><span class="w">
      </span><span class="p">}</span><span class="w">
    </span><span class="p">},</span><span class="w">
    </span><span class="p">{</span><span class="w">
      </span><span class="nl">"remove"</span><span class="p">:</span><span class="w"> </span><span class="p">{</span><span class="w">
        </span><span class="nl">"field"</span><span class="p">:</span><span class="w"> </span><span class="s2">"whisperer.created_at"</span><span class="p">,</span><span class="w">
        </span><span class="nl">"ignore_missing"</span><span class="p">:</span><span class="w"> </span><span class="kc">true</span><span class="w">
      </span><span class="p">}</span><span class="w">
    </span><span class="p">},</span><span class="w">
    </span><span class="p">{</span><span class="w">
      </span><span class="nl">"set"</span><span class="p">:</span><span class="w"> </span><span class="p">{</span><span class="w">
        </span><span class="nl">"field"</span><span class="p">:</span><span class="w"> </span><span class="s2">"host.name"</span><span class="p">,</span><span class="w">
        </span><span class="nl">"copy_from"</span><span class="p">:</span><span class="w"> </span><span class="s2">"whisperer.host.name"</span><span class="p">,</span><span class="w">
        </span><span class="nl">"ignore_empty_value"</span><span class="p">:</span><span class="w"> </span><span class="kc">true</span><span class="w">
      </span><span class="p">}</span><span class="w">
    </span><span class="p">}</span><span class="w">
  </span><span class="p">],</span><span class="w">
  </span><span class="nl">"on_failure"</span><span class="p">:</span><span class="w"> </span><span class="p">[</span><span class="w">
    </span><span class="p">{</span><span class="w">
      </span><span class="nl">"set"</span><span class="p">:</span><span class="w"> </span><span class="p">{</span><span class="w">
        </span><span class="nl">"field"</span><span class="p">:</span><span class="w"> </span><span class="s2">"error.pipeline"</span><span class="p">,</span><span class="w">
        </span><span class="nl">"value"</span><span class="p">:</span><span class="w"> </span><span class="s2">"whisperer"</span><span class="w">
      </span><span class="p">}</span><span class="w">
    </span><span class="p">},</span><span class="w">
    </span><span class="p">{</span><span class="w">
      </span><span class="nl">"set"</span><span class="p">:</span><span class="w"> </span><span class="p">{</span><span class="w">
        </span><span class="nl">"field"</span><span class="p">:</span><span class="w"> </span><span class="s2">"error.message"</span><span class="p">,</span><span class="w">
        </span><span class="nl">"value"</span><span class="p">:</span><span class="w"> </span><span class="s2">""</span><span class="w">
      </span><span class="p">}</span><span class="w">
    </span><span class="p">}</span><span class="w">
  </span><span class="p">]</span><span class="w">
</span><span class="p">}</span><span class="w">
</span></code></pre></div></div>

<p>Of course the pipeline is not perfect and can be improved - but it is a good starting point.</p>

<h2 id="kibana-dashboard">Kibana Dashboard</h2>

<p>Finally we can browse the data in Kibana:
<img src="/assets/images/whisperer/whisperer_sample_data.png" alt="Kibana Dashboard" /></p>

<p>Every workstation in the Active Directory domain is now reporting the status of the agents.
Additionally we can create an Elastic transform to get only the latest status of the agents for each workstation.
Here’s an example of the transform — remember to start it separately after creation with <code class="language-plaintext highlighter-rouge">POST _transform/inventory-whisperer/_start</code>:</p>
<div class="language-json highlighter-rouge"><div class="highlight"><pre class="highlight"><code><span class="err">PUT</span><span class="w"> </span><span class="err">_transform/inventory-whisperer</span><span class="w">
</span><span class="p">{</span><span class="w">
  </span><span class="nl">"source"</span><span class="p">:</span><span class="w"> </span><span class="p">{</span><span class="w">
    </span><span class="nl">"index"</span><span class="p">:</span><span class="w"> </span><span class="p">[</span><span class="w">
      </span><span class="s2">"logs-whisperer-default"</span><span class="w">
    </span><span class="p">]</span><span class="w">
  </span><span class="p">},</span><span class="w">
  </span><span class="nl">"latest"</span><span class="p">:</span><span class="w"> </span><span class="p">{</span><span class="w">
    </span><span class="nl">"unique_key"</span><span class="p">:</span><span class="w"> </span><span class="p">[</span><span class="w">
      </span><span class="s2">"host.name"</span><span class="w">
    </span><span class="p">],</span><span class="w">
    </span><span class="nl">"sort"</span><span class="p">:</span><span class="w"> </span><span class="s2">"@timestamp"</span><span class="w">
  </span><span class="p">},</span><span class="w">
  </span><span class="nl">"dest"</span><span class="p">:</span><span class="w"> </span><span class="p">{</span><span class="w">
    </span><span class="nl">"index"</span><span class="p">:</span><span class="w"> </span><span class="s2">"inventory-whisperer"</span><span class="w">
  </span><span class="p">}</span><span class="w">
</span><span class="p">}</span><span class="w">
</span></code></pre></div></div>

<h2 id="detection-opportunities">Detection Opportunities</h2>

<p>The Whisperer data isn’t just for operational dashboards. It opens up some interesting detection use cases:</p>

<ul>
  <li><strong>Agent tampering</strong>: if a host that was previously reporting a running Elastic Agent suddenly reports <code class="language-plaintext highlighter-rouge">stopped</code> or <code class="language-plaintext highlighter-rouge">none</code>, that warrants investigation. Adversaries commonly target security tooling early in an attack. We can also catch administrators that are stopping the agents.</li>
  <li><strong>Version anomalies</strong>: a host running a significantly older agent version than the rest of the fleet may indicate that the agent is broken.</li>
  <li><strong>Defender exclusion changes</strong>: new exclusion paths or processes appearing across the fleet outside of a change window are a high-fidelity signal worth alerting on.</li>
  <li><strong>Gaps in telemetry</strong>: hosts that stop reporting entirely are a blind spot. Correlating Whisperer check-ins against your SIEM’s endpoint list lets you identify hosts generating no telemetry at all.</li>
</ul>

<h2 id="limitations">Limitations</h2>

<p>This is a proof of concept, so there are rough edges. The receiver has no deduplication logic, so a host that reboots twice in a day will submit two records. The script also runs in the context of <code class="language-plaintext highlighter-rouge">SYSTEM</code>, which means it can’t capture per-user agent state.</p>

<h2 id="summary">Summary</h2>

<p>The Whisperer is a simple but effective way to get visibility into the health of your security tooling across a large Active Directory environment. It costs almost nothing to deploy, generates structured data that integrates naturally into an existing Elasticsearch stack, and surfaces gaps that you simply can’t see from agent-side telemetry alone — because those gaps are, by definition, silent.</p>

<p>The full script is on GitHub. Feedback welcome.</p>]]></content><author><name>Filip Wozniak</name></author><category term="detection" /><category term="monitoring" /><category term="agents" /><category term="elastic" /><summary type="html"><![CDATA[How to monitor the health of your agents in an Active Directory Environment using Elastic SIEM.]]></summary></entry><entry><title type="html">Hello World</title><link href="https://filippwn.github.io/blog/2026/04/hello-world/" rel="alternate" type="text/html" title="Hello World" /><published>2026-04-07T00:00:00+00:00</published><updated>2026-04-07T00:00:00+00:00</updated><id>https://filippwn.github.io/blog/2026/04/hello-world</id><content type="html" xml:base="https://filippwn.github.io/blog/2026/04/hello-world/"><![CDATA[<p>Hello there.</p>

<p>I figured the obligatory first post is as good a place as any to explain what this blog is and why it exists.</p>

<p>If you want to know more about who I am — my background, certs, what I work on day to day — head over to the <a href="/about/">About</a> page.</p>

<h2 id="what-this-blog-is-about">What this blog is about</h2>

<p>Honestly? Things I find cool.</p>

<p>I’m not going to commit to a strict content schedule or a neatly defined scope. If something catches my attention — a technique, a tool, a CTF challenge, a weird edge case I ran into — and I think it’s worth writing down, I’ll write it down. That might be a full CTF writeup, a short note on a detection idea, something offensive, something defensive, or just a random rabbit hole I went down.</p>

<p>The common thread is that I genuinely found it interesting. No filler, no content for the sake of content.</p>

<h2 id="what-you-might-find-here">What you might find here</h2>

<ul>
  <li>CTF writeups — focused on methodology, not just “here’s the flag”</li>
  <li>Detection engineering and threat hunting notes</li>
  <li>Red team techniques and tooling</li>
  <li>Whatever else ends up being interesting enough to write about</li>
</ul>

<h2 id="the-stack">The stack</h2>

<p>The site is built with Jekyll and hosted on GitHub Pages. Plain HTML and CSS, no JavaScript. Source is at <a href="https://github.com/FilipPwn/filippwn.github.io">github.com/FilipPwn/filippwn.github.io</a> if you’re curious.</p>

<p>Anyway — more posts to come. Eventually.</p>]]></content><author><name>Filip Wozniak</name></author><category term="meta" /><summary type="html"><![CDATA[First post. What this blog is about and what to expect.]]></summary></entry><entry><title type="html">HackTheBox CAPE Certification</title><link href="https://filippwn.github.io/blog/2025/03/hackthebox-cape-certification/" rel="alternate" type="text/html" title="HackTheBox CAPE Certification" /><published>2025-03-15T00:00:00+00:00</published><updated>2025-03-15T00:00:00+00:00</updated><id>https://filippwn.github.io/blog/2025/03/hackthebox-cape-certification</id><content type="html" xml:base="https://filippwn.github.io/blog/2025/03/hackthebox-cape-certification/"><![CDATA[<h2 id="tldr">TL;DR</h2>

<ul>
  <li>CAPE (Certified Active Directory Penetration Testing Expert) is HackTheBox’s most advanced AD-focused certification, requiring ~3–4 months of dedicated preparation and a 10-day practical exam</li>
  <li>The certification combines comprehensive learning (15 modules) with a challenging practical exam that tests both technical skills and report writing abilities</li>
  <li>Key success factors: strong AD fundamentals (CPTS recommended), dedicated study time, thorough documentation, and report writing skills</li>
  <li>Worth it if you’re serious about AD security, but not an entry-level cert — expect to invest 160–320 hours total (learning path + exam)</li>
  <li>Best suited for security professionals looking to master enterprise AD security, whether from red or blue team backgrounds</li>
</ul>

<hr />

<h2 id="introduction">Introduction</h2>

<p>I recently achieved something remarkable — passing the HackTheBox CAPE exam on my first attempt. As one of the few individuals who’ve accomplished this feat, and noticing the lack of comprehensive reviews, I decided to share my experience with the cybersecurity community.</p>

<h2 id="about-cape">About CAPE</h2>

<p><img src="/assets/images/cape-certification/cape-logo.png" alt="CAPE Certification Logo" /></p>

<p>HackTheBox CAPE (Certified Active Directory Penetration Testing Expert) stands as one of the most rigorous certifications in the cybersecurity landscape. As HTB’s fifth certification offering, it distinguishes itself through its laser focus on Active Directory penetration testing.</p>

<p>Before attempting the certification exam, candidates must complete an intensive learning path consisting of 15 comprehensive modules — 6 medium-difficulty and 9 hard-difficulty. The curriculum is meticulously designed to cover every aspect of Active Directory security:</p>

<ul>
  <li><strong>Active Directory Enumeration</strong> — mastering both external tools (PowerView, BloodHound) and built-in Windows utilities</li>
  <li><strong>Windows Lateral Movement</strong> — deep dive into protocols like WMI, SMB, RDP, DCOM, and WSUS exploitation</li>
  <li><strong>Netexec</strong> — the Swiss Army knife of AD pentesting, offering versatile attack capabilities</li>
  <li><strong>Kerberos Attacks</strong> — comprehensive coverage of Kerberos authentication vulnerabilities</li>
  <li><strong>DACL Attacks</strong> — exploring common privilege escalation paths and advanced techniques like GPO abuse</li>
  <li><strong>NTLM Relay Attacks</strong> — achieving privilege escalation without credential compromise</li>
  <li><strong>ADCS Attacks</strong> — in-depth exploration of 11 ESC paths using modern tools like Certipy and Certify</li>
  <li><strong>Active Directory Trust Attacks</strong> — both intra-forest and cross-forest exploitation techniques</li>
  <li><strong>C2 Operations</strong> — hands-on experience with the Sliver C2 framework</li>
  <li><strong>Windows Evasion Techniques</strong> — advanced methods to bypass Windows Defender (having your own Visual Studio installed is my recommendation)</li>
  <li><strong>Enterprise Service Attacks</strong> — essential techniques for compromising MSSQL, Exchange, and SCCM</li>
</ul>

<blockquote>
  <p>The learning path assumes foundational knowledge in penetration testing methodology and general security concepts. Prior completion of CPTS is highly recommended.</p>
</blockquote>

<h2 id="about-the-exam">About the Exam</h2>

<p>The CAPE exam simulates a real-world internal penetration test against an enterprise Active Directory environment. Candidates are tasked with conducting a professional security assessment that includes reading and acknowledging a letter of engagement, identifying and exploiting vulnerabilities and misconfigurations, and producing a comprehensive, commercial-grade penetration testing report.</p>

<h3 id="key-exam-details">Key Exam Details</h3>

<ul>
  <li><strong>Duration:</strong> 10 days to complete both the penetration test and submit the final report</li>
  <li><strong>Environment:</strong> Dedicated testing environment accessible via VPN</li>
  <li><strong>Format:</strong> Non-proctored examination</li>
  <li><strong>Objectives:</strong> Multiple flags must be captured to demonstrate progress</li>
  <li><strong>Retake Policy:</strong> Free second attempt within 14 days if initial report is submitted, with detailed examiner feedback on your first attempt</li>
  <li><strong>Assessment:</strong> Primary evaluation based on report quality, not just flag capture</li>
</ul>

<h3 id="time-management">Time Management</h3>

<p>The 10-day exam duration is both a blessing and a challenge. Unlike typical 24/48-hour certification exams, CAPE requires careful time management and dedication:</p>

<ul>
  <li>It’s not recommended to attempt this exam “after-hours” or alongside regular work</li>
  <li>The complexity demands focused, dedicated time for both testing and documentation</li>
  <li>Report writing alone can take multiple days to complete properly</li>
</ul>

<h3 id="technical-aspects">Technical Aspects</h3>

<ul>
  <li>The exam environment is fully dedicated to each candidate</li>
  <li>Environment can be reset as needed, but changes are not persistent</li>
  <li>Machine resets affect the entire environment, not individual systems</li>
  <li>Multiple complex steps are typically required to capture each flag</li>
</ul>

<h3 id="report-requirements">Report Requirements</h3>

<p>The report is the cornerstone of the exam evaluation:</p>

<ul>
  <li>A mandatory template must be followed</li>
  <li>Each finding requires detailed documentation and evidence</li>
  <li>Recommendations must demonstrate meaningful impact on environmental security</li>
  <li>Quality and completeness of the report directly determine exam success</li>
</ul>

<blockquote>
  <p>While flag capture demonstrates technical ability, the report’s quality is the primary factor in passing the exam. The second attempt opportunity is only provided if a complete report was submitted in the first attempt.</p>
</blockquote>

<hr />

<h2 id="preparations">Preparations</h2>

<h3 id="my-background">My Background</h3>

<p><img src="/assets/images/cape-certification/blue-red-side.png" alt="A true cybersecurity master wields both the blue and red side" /></p>

<p>As a detection engineer and threat hunter by profession, my journey to CAPE was somewhat unconventional. Despite never having conducted a formal penetration test in a real environment, I firmly believe in the principle: <em>“to catch a hacker, you need to think like one”</em> (if you’ve read Mitnick’s <em>Ghost in the Wires</em> — you know what I mean). This mindset, combined with my blue team experience, led me to pursue offensive security certifications.</p>

<h3 id="prerequisites-and-prior-experience">Prerequisites and Prior Experience</h3>

<p>My path to CAPE included several key milestones:</p>

<ul>
  <li><strong>CPTS Certification</strong> — completed HackTheBox’s Certified Penetration Tester Specialist exam, which I consider essential groundwork for CAPE</li>
  <li><strong>Pro Labs Experience</strong> — completed multiple HTB Pro Labs including Dante, Zephyr, Offshore, and Alchemy, strengthening my methodology in enterprise-like environments</li>
  <li><strong>CRTP Certification</strong> — finished Altered Security’s Red Team Professional course, providing additional AD-focused expertise from a red team perspective</li>
</ul>

<h3 id="the-learning-path-experience">The Learning Path Experience</h3>

<p>The CAPE learning path requires a Gold Subscription to HackTheBox. What sets HTB’s learning approach apart is their focus on practical, hands-on learning through reading, understanding, and performing. Instead of relying on potentially outdated video tutorials, the content remains current and accessible even after subscription expiration. I did it slowly but steadily, trying to dedicate at least a few hours every week.</p>

<h3 id="standout-modules">Standout Modules</h3>

<p>Three modules particularly impressed me during the learning path:</p>

<p><strong>1. ADCS Attacks</strong>
Comprehensive coverage of AD CS misconfigurations, aligned with SpecterOps’ cutting-edge research, with a clear explanation of complex exploitation paths.</p>

<p><strong>2. Introduction to Windows Evasion Techniques</strong>
A unique approach to defensive bypass techniques covering static/dynamic analysis, process injection, AMSI and UAC bypass, AppLocker evasion, and PowerShell Constrained Language Mode. Hands-on coding with Visual Studio is recommended.</p>

<p><strong>3. Using NetExec (formerly CrackMapExec)</strong>
A deep dive into this versatile tool’s capabilities, with practical applications for streamlining AD penetration testing.</p>

<p>All modules remain accessible post-completion, serving as valuable reference material during the exam and future engagements.</p>

<hr />

<h2 id="the-exam-experience">The Exam Experience</h2>

<h3 id="setup-and-environment">Setup and Environment</h3>

<p>Picture this: 10 days of pure focus, a complex enterprise AD environment, and a mission to compromise it completely. That’s the CAPE exam in a nutshell. Drawing from my previous HTB CPTS experience, I approached this challenge with a carefully prepared environment:</p>

<ul>
  <li><strong>Kali Linux VM</strong> — pre-configured with tools from the learning path</li>
  <li><strong>Windows 10 VM</strong> — equipped with Visual Studio for evasion techniques</li>
  <li><strong>Obsidian</strong> — for comprehensive note-taking, crucial for report writing</li>
</ul>

<h3 id="the-journey">The Journey</h3>

<p>The exam proved to be a true test of understanding rather than mere tool proficiency. Several key observations stood out:</p>

<ul>
  <li><strong>Deep Understanding Required</strong> — simply following “exploit playbooks” proved insufficient; each challenge demanded thorough comprehension of the underlying concepts</li>
  <li><strong>Continuous Learning</strong> — even during the exam, I found myself researching newly discovered vulnerabilities to fully understand their impact</li>
  <li><strong>Persistence Pays Off</strong> — what initially seemed like impenetrable barriers became stepping stones with a methodical approach</li>
  <li><strong>Building Momentum</strong> — each successful exploitation provided momentum for tackling subsequent challenges</li>
</ul>

<p>I was about to give up on day 6. I didn’t.</p>

<p><img src="/assets/images/cape-certification/day6-meme.png" alt="Persistence pays off" /></p>

<h3 id="mental-approach">Mental Approach</h3>

<p>The exam tested not just technical skills but also mental resilience:</p>

<ul>
  <li><strong>Taking Breaks</strong> — regular walks helped clear my mind when faced with challenging obstacles</li>
  <li><strong>Self-Care</strong> — maintaining good sleep patterns and regular meals proved crucial for sustained performance</li>
  <li><strong>Attention to Detail</strong> — often, a small overlooked detail was the key to progress</li>
  <li><strong>Time Management</strong> — completing 90% of the technical portion 36 hours before deadline allowed adequate time for report writing</li>
</ul>

<h3 id="final-push">Final Push</h3>

<p><img src="/assets/images/cape-certification/day1-vs-day10.png" alt="Day 1 vs Day 10" /></p>

<p>The last phase of my exam journey included dedicating a full day to report writing, resulting in a comprehensive <strong>142-page document</strong>, and using the final 6 hours to achieve 100% completion of all objectives.</p>

<hr />

<h2 id="conclusions-and-advice">Conclusions and Advice</h2>

<h3 id="overall-assessment">Overall Assessment</h3>

<p>CAPE stands out as an exceptional learning path and certification for anyone serious about Active Directory security. It provides in-depth knowledge of AD security concepts, offers practical real-world scenarios, and prepares you thoroughly for enterprise-level challenges.</p>

<h3 id="time-investment">Time Investment</h3>

<p>This is not a certification to be taken lightly:</p>

<ul>
  <li>Learning path: ~36 days (~100–200 hours)</li>
  <li>Exam preparation and execution: 60–120 hours</li>
  <li><strong>Total commitment: expect to invest 3–4 months of dedicated study</strong></li>
</ul>

<h3 id="prerequisites">Prerequisites</h3>

<p>CAPE is definitely an intermediate-level certification. Before attempting it, ensure you:</p>

<ul>
  <li>Have completed CPTS certification</li>
  <li>Have experience with several HTB Pro Labs</li>
  <li>Are comfortable with pivoting and lateral movement</li>
  <li>Know multiple tools for each attack technique</li>
  <li>Have strong environment awareness skills</li>
</ul>

<h3 id="key-tips-for-success">Key Tips for Success</h3>

<p><strong>Documentation</strong></p>
<ul>
  <li>Take detailed notes during the exam</li>
  <li>Document every exploitation path</li>
  <li>Keep organized records of all credentials</li>
  <li>Start report writing early</li>
</ul>

<p><strong>Learning Path Approach</strong></p>
<ul>
  <li>Don’t rush through the modules</li>
  <li>Understand the <em>why</em> behind each technique</li>
  <li>Use modules as reference material during the exam</li>
  <li>Review challenging modules before the exam</li>
</ul>

<p><strong>Exam Strategy</strong></p>
<ul>
  <li>Prepare your VM environment in advance</li>
  <li>Practice thorough enumeration — it is key</li>
  <li>Take regular breaks when stuck</li>
  <li>Maintain work-life balance during the exam</li>
</ul>

<h3 id="final-thoughts">Final Thoughts</h3>

<p>CAPE is more than just another certification — it’s a transformative journey into the depths of Active Directory security. While it may not yet have widespread HR recognition, its technical depth and practical approach make it invaluable for security professionals. The certification’s commitment to keeping materials current and relevant ensures that the skills you gain will remain applicable in real-world scenarios.</p>

<p>The journey through CAPE isn’t just about passing an exam — it’s about becoming a more competent cybersecurity professional.</p>

<hr />

<p><em>This post was originally published on <a href="https://medium.com/@filip.bartosz.wozniak/hackthebox-cape-certification-700737050cd6">Medium</a>.</em></p>]]></content><author><name>Filip Wozniak</name></author><category term="certification" /><category term="htb" /><category term="active-directory" /><summary type="html"><![CDATA[My experience with the HackTheBox CAPE exam — preparation, the exam itself, and tips for anyone considering it.]]></summary></entry></feed>